Submitting Your First Pull Request

Originally posted to http://blogs.msdn.com/b/cdndevs/archive/2016/01/06/submitting-your-first-pull-request.aspx

Over the last few years, we have seen a big shift in the .NET community towards open source. In addition to a huge number of open source community led projects, we have also seen Microsoft move major portions of the .NET framework over to GitHub.

With all these packages out in the wild, the opportunities to contribute are endless. The process however can be a little daunting for first timers, especially if you are not using git in your day-to-day work. In this post I will guide you through the process of submitting your first pull request. I will show examples from my experience contributing to the Humanitarian Toolbox‘s allReady project. As with all things git related, there is more than one way to do everything. This post will outline the workflow I have been using and should serve as a good starting point for most .NET developers who are interested in getting started with open source projects hosted on GitHub.

Installing GitHub for Windows

The first step is to install GitHub for Windows. GitHub’s Windows desktop app is great, but the installer also installs the excellent posh-git command line tools. We will be using a combination of the desktop app and the command line tools.

Forking a Repo

The next step is to fork the repository (repo for short) to which you are hoping to contribute. It is very unlikely that you will have permissions to check in code directly to the actual repo. Those permissions are reserved for project owners. The process instead is to fork the repo. A fork is a copy of the repo that you own and can do whatever you want with. Create a fork by clicking the Fork button on the repo.

Forking a repo

This will create the fork for you. This is where you will be making changes and then submitting a pull request to get your changes merged in to the original repo.
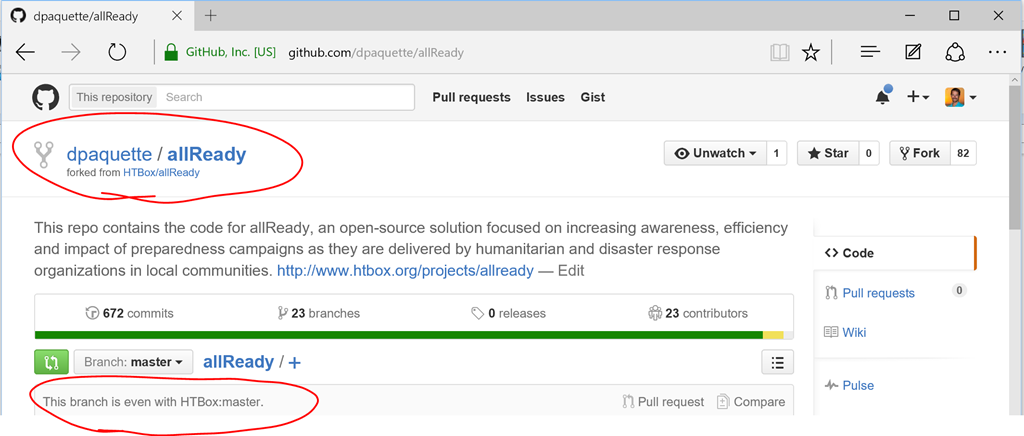
Your forked repo

Notice on my fork’s master branch where it says This branch is even with HTBox:master. The branch HTBox:master is the master branch from the original repo and is the upstream for my master branch. When GitHub tells me my branch is even with master that means no changes have happened to HTBox:master and no changes have happened to my master branch. Both branches are identical at this point.

Cloning your fork to your local machine

Next up, you will want to clone the repo to your local machine. Launch GitHub for Windows and sign in with your GitHub account if you have not already done so. Click on the + icon in the top right, select Clone and select the repo that you just forked. Click the big checkmark button at the bottom and select a location to clone the repo on your local disk.
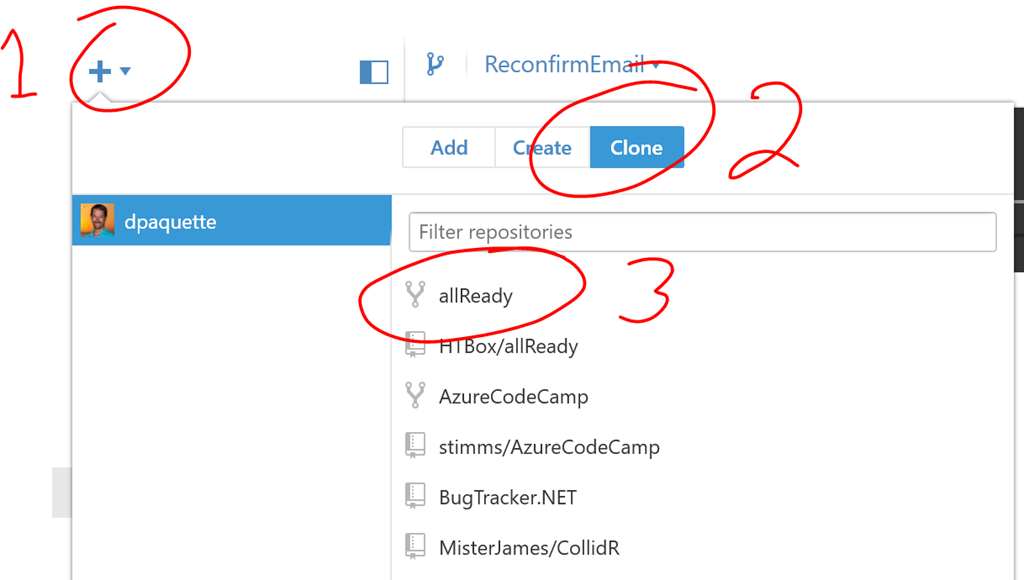
Cloning your fork

Create a local branch to do your work in

You could do all your work in your master branch, but this might be a problem if you intend to submit more than one pull request to the project. You will have trouble working on your second pull request until after your first pull request has been accepted. Instead it is best practice to create a new branch for each pull request you intend to submit.

As a side note, it is also considered best practice to submit pull requests that solve 1 issue at a time. Don’t fix 10 separate issues and submit a single pull request that contains all those fixes. That makes it difficult for the project owners to review your submission.

We could use GitHub for Windows to create the branch, but we’re going to drop down to the command line here instead. Using the command line to do git operations will give you a better appreciation for what is happening.

To launch the git command line, select your fork in GitHub for Windows, click on the Settings menu in the top right and select Open in Git Shell.
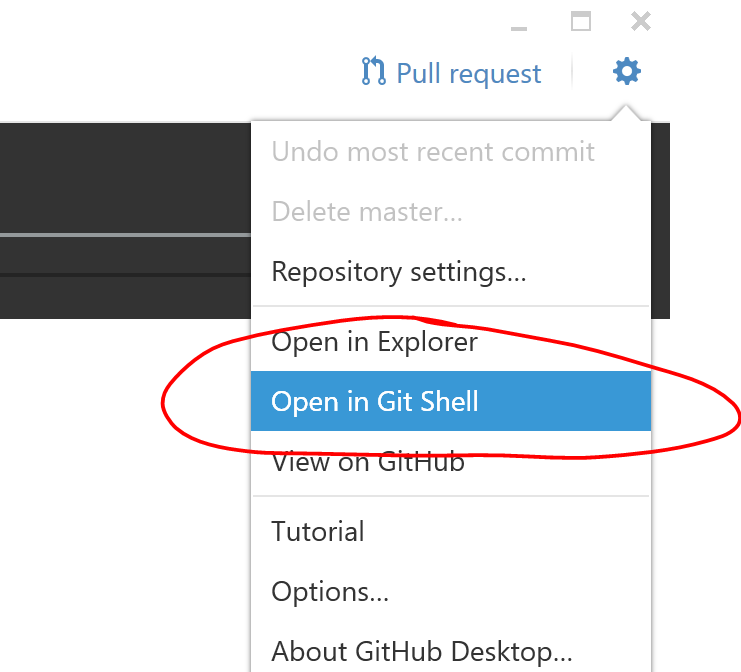
Open Git shell

This will open a posh-git shell. From here, type the command git checkout -b MyNewBranch, where MyNewBranch is a descriptive name for your new branch.

Create new branch

This command will create a new branch with the specified name and switch you to that branch. Notice how posh-git gives you a nice indication of what branch you are currently working on.

Advanced Learning: Learn more about git branching with this interactive tutorial http://pcottle.github.io/learnGitBranching/

Pro tip: posh-git has auto complete. Type git ch + tab will autocomplete to git checkout. Press tab multiple times to cycle through available options. This is a great learning tool!

Committing and publishing your changes

The next step is to commit and publish your changes to GitHub. Make your changes just like you normally would (Enjoy…this is the part where you actually get to write code!). When you are done making your changes, you can view a list of your changes by typing the git status command.
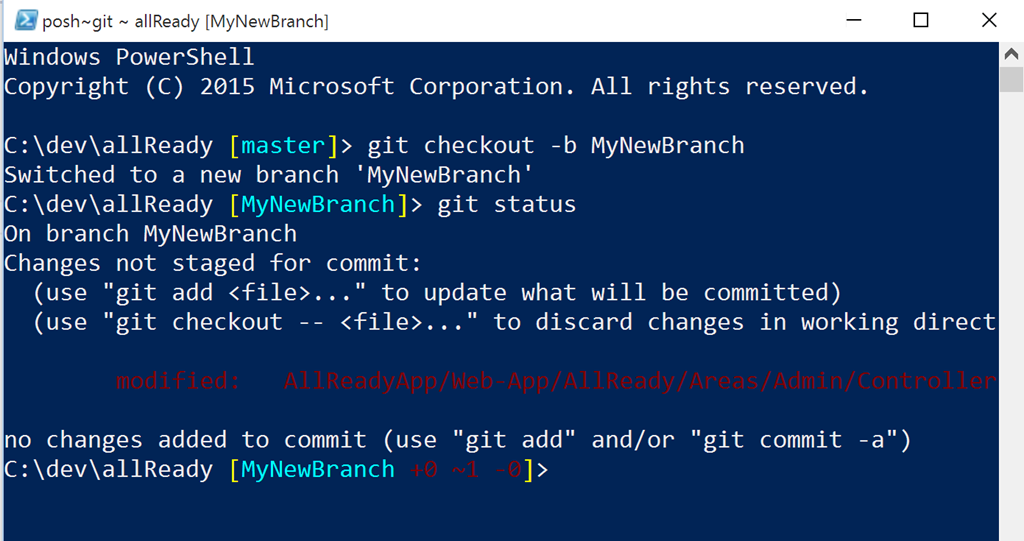
git status

To commit your changes, you first need to add them to your current set of changes. To add all your changes, enter the git add –A command. Note that the git add command doesn’t actually do anything other than get those changes ready to commit. Once your changes have been added, you can commit your changes using the git commit –m "Your commit message" command.
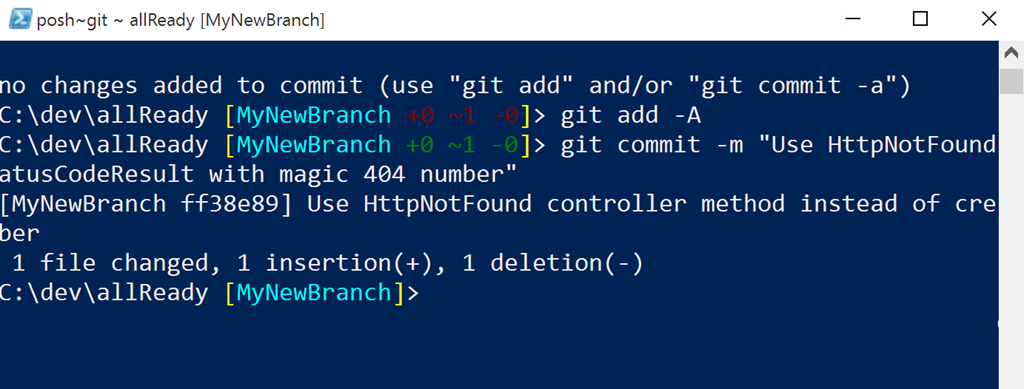
git commit

If you wanted to commit only some of the files you changed, you would need to add each of the files individually before doing the commit. This can be a little tedious. In this case, you might want to use the GitHub for Windows app. Simply select the files that you want to include, enter your commit message and click the Commit to YourBranch button. This will do both the add and commit operations as a single operation. The GitHub for Windows app also shows you a diff for each file which makes it a great tool for reviewing your changes.
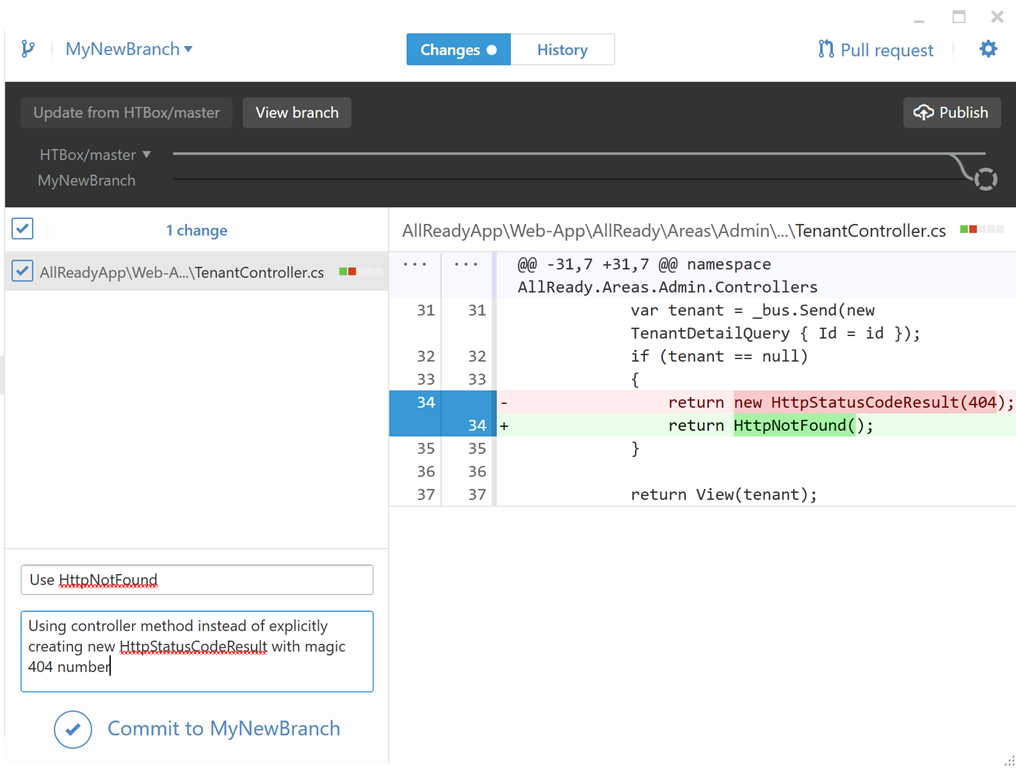
Review changes

Now your changes have been committed locally, but they have not been published to GitHub yet. To do this, you need to push your branch to a copy on GitHub. You can do this from the command line by using the git push command.
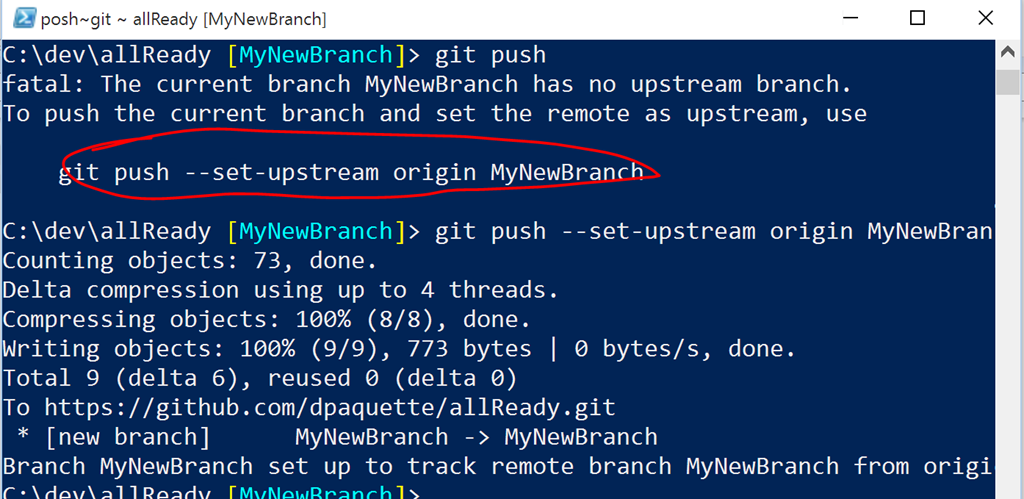
git push

Notice that git detected this branch does not exist on GitHub yet and very kindly tells me the command I need to use to create the upstream branch. Alternatively, you could simply use the Publish button in GitHub for Windows.

Publish from GitHub for Windows

Now the branch containing your changes should show up in your fork on the GitHub website.
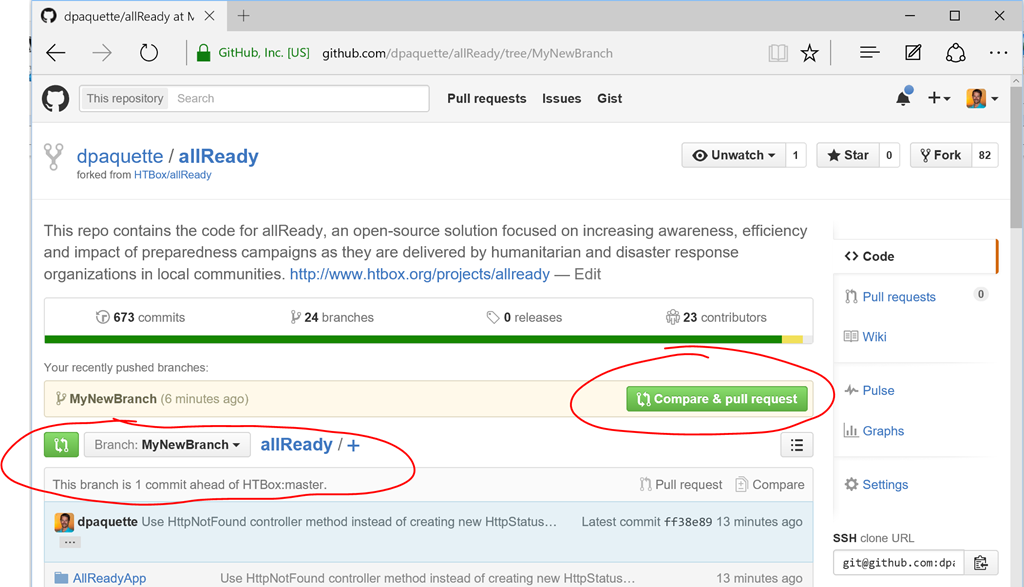
Published branch

GitHub says my branch is 1 commit ahead of HTBox:master. That’s what I want to see. I made 1 commit in my branch and no one has made any commits to HTBox:master since I created my fork. That should make my pull request clean and easy to merge. In some cases, HTBox:master will have changed since the time you started working on your branch. We’ll take a look at how to handle that situation later. For now let’s proceed with creating this pull request.

Creating your pull request

The next step is to create a pull request so your code can (hopefully) be merged into the original repo.

To create your pull request, click on the Compare & pull request button that is displayed when viewing your branch on the GitHub website. If for some reason that button is not visible, click the Pull Request link on your branch.
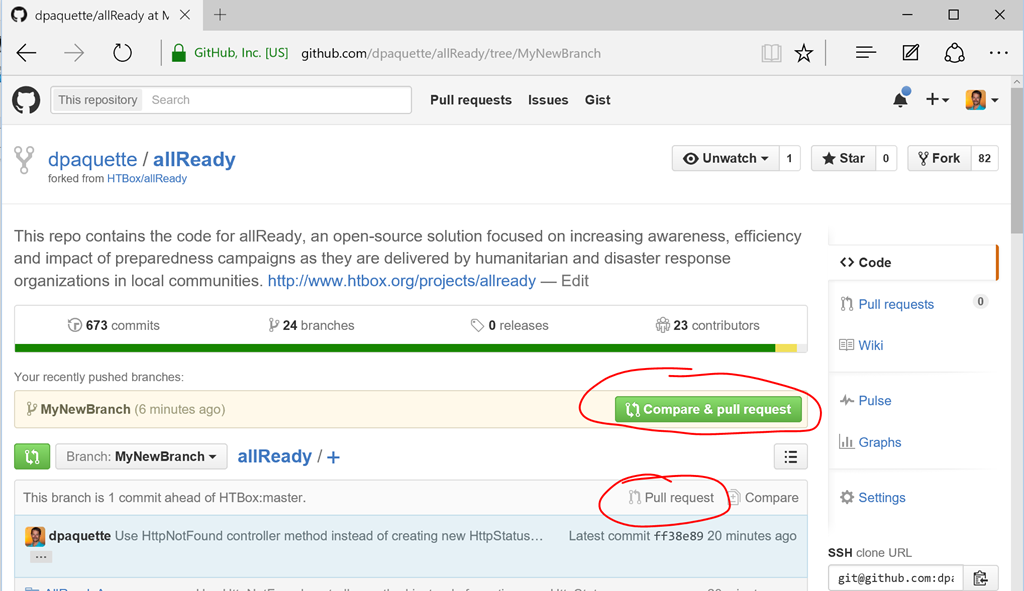
Create pull request

On the Pull Request page, you can scroll down to review the changes you are submitting. For some projects, you will also see a link to guidelines for contributing. Be descriptive in your pull request. Provide information on the change you made so the project owners know exactly what you were trying to accomplish. If there is an issues you are addressing with this pull request you should reference it by number (e.g. #124) in the description of your pull request. If everything looks good, click the Create Pull Request button.
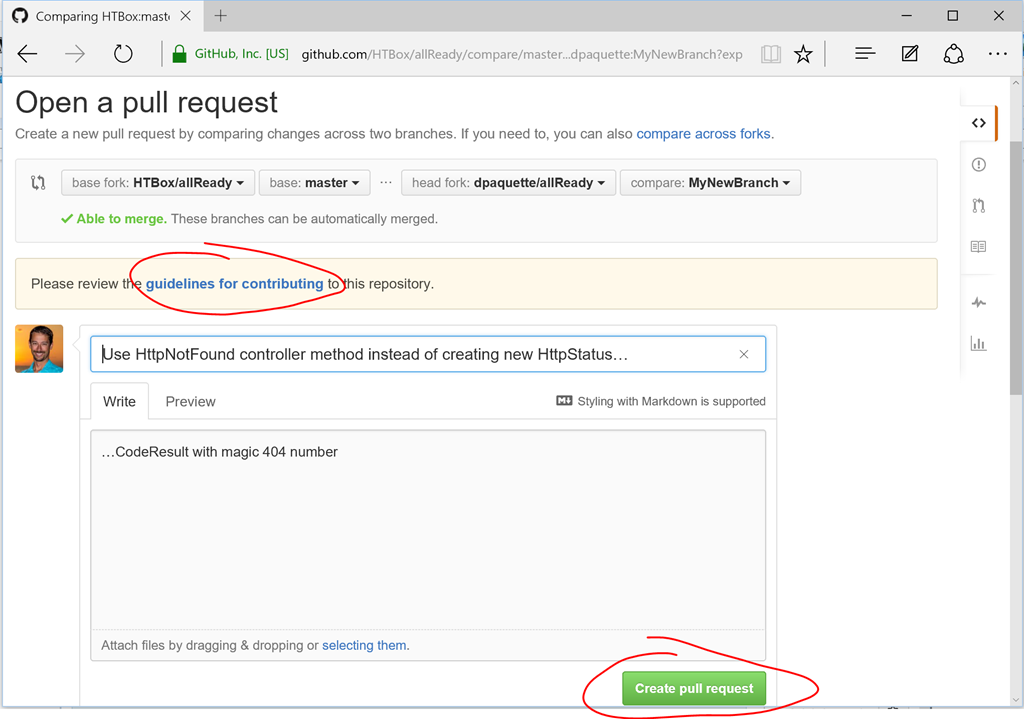
Enter pull request details

Your pull request has now been created and is ready for the project owners to review (and hopefully accept). Some projects will have automated checks that happen for each pull request. allReady has an AppVeyor build that compiles the application and runs unit tests. You should monitor this and ensure that all the checks pass.
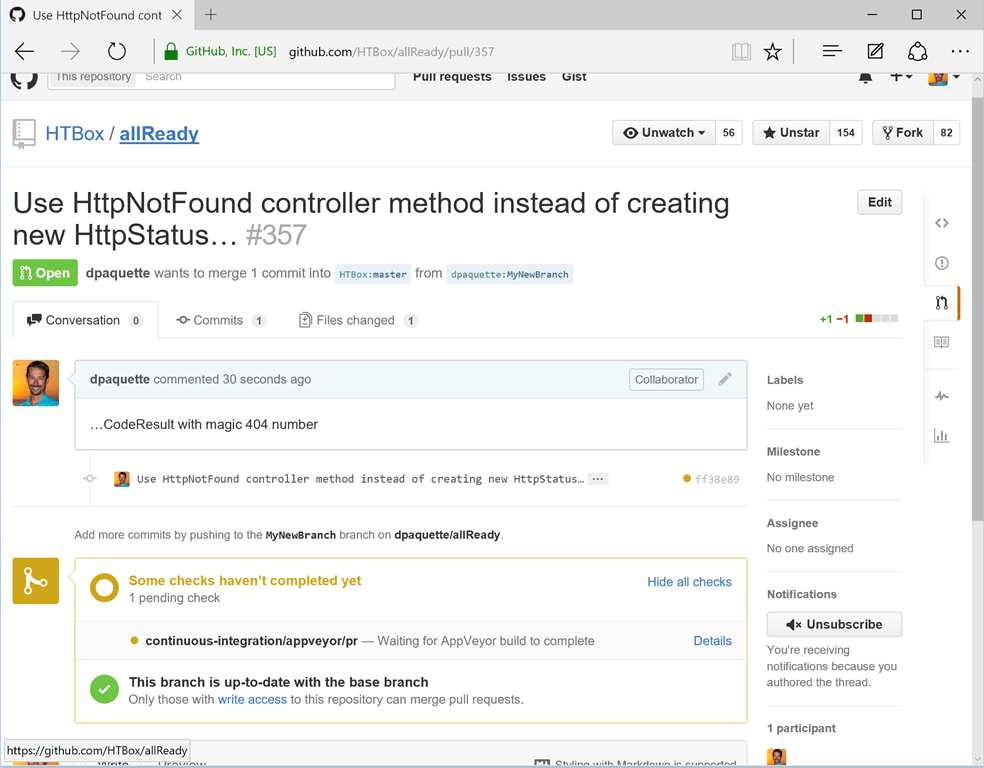
Automated checks on pull requests

If all goes as planned, your pull request will be accepted and you will feel a great sense of accomplishment. Of course, things don’t always go as planned. Let’s explore how to handle a few common scenarios.

Making changes to an existing pull request

Often, the project owners will make comments on your pull request and ask you to make some changes. Don’t feel bad if this happens…my first pull request to a large project had 59 comments and required a fair bit of rework before it was finally merged in to the master branch. When this happens, don’t close the pull request. Simply make your changes locally, commit them to your local branch, then push those changes to GitHub.
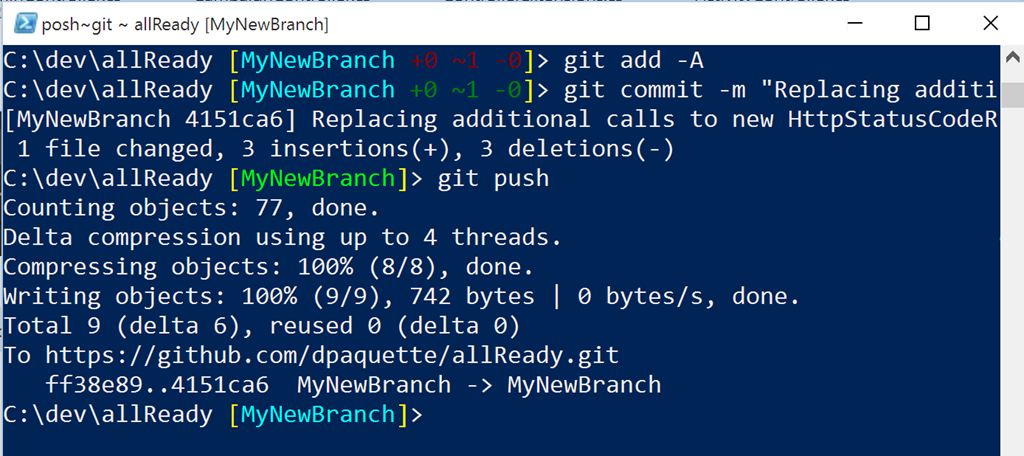
Push changes to an existing pull request

The push can be done using the GitHub for Windows app by clicking the Sync button.

Push changes to an existing pull request

As soon as your changes have been pushed to GitHub the new commit will appear in the pull request. Any required checks will be re-run and the conversation with the project owners can continue. Really that’s what a pull request is: An ongoing conversation about a set of proposed changes to the code base.
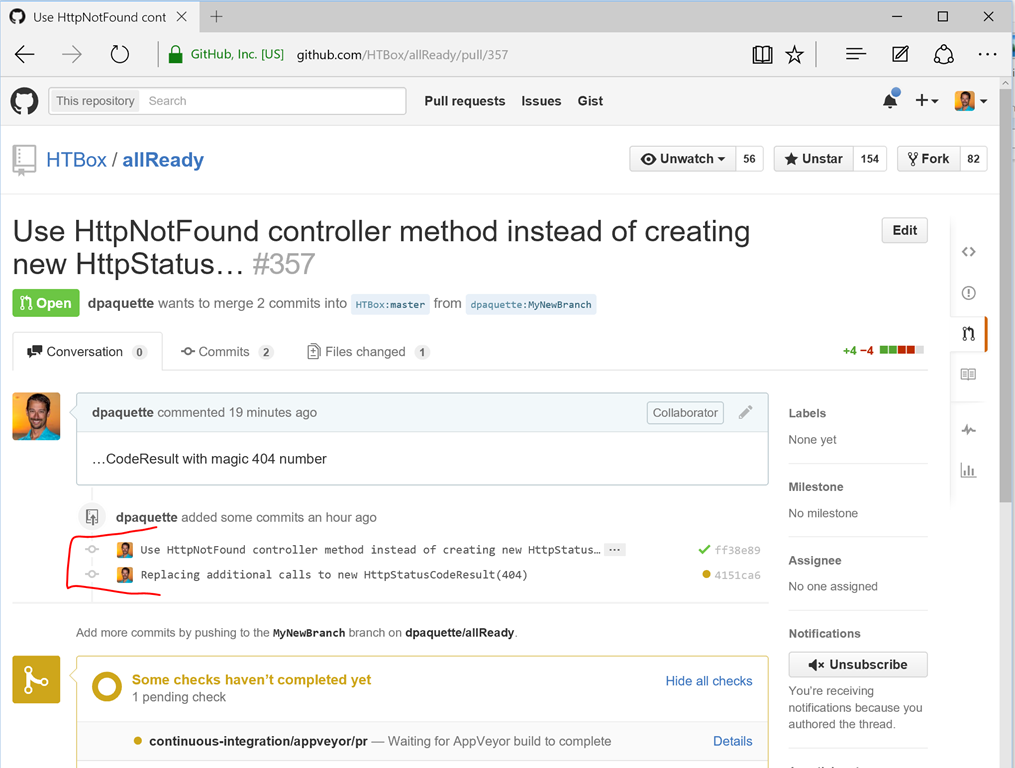
Pull request with multiple changes

Keeping your fork up to date

Another common scenario is that your fork (and branches) become out of date. This happens any time changes are made to the original repo. You can see in this example that 4 commits have been made to HTBox:master since I created my pull request.
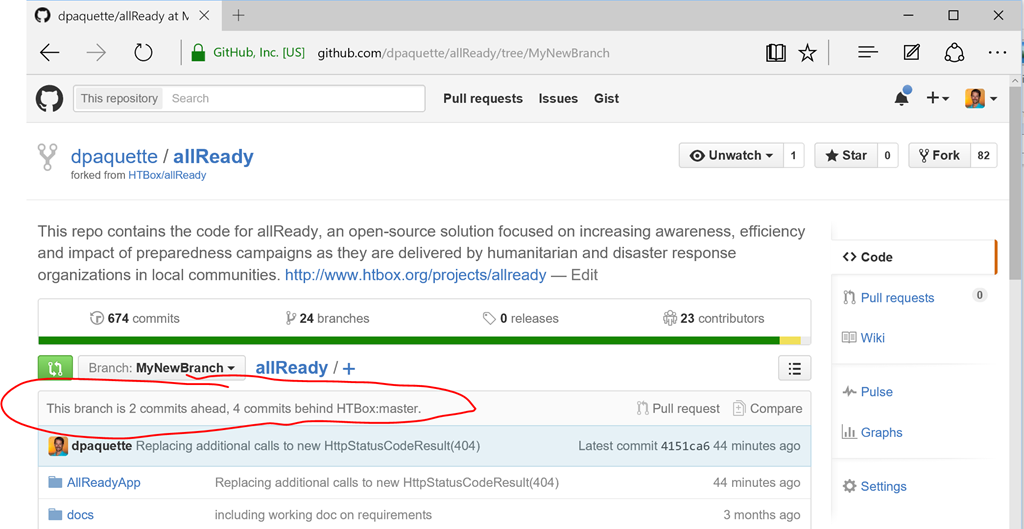
Branch out of date

It is a good idea to make sure that your branch is not behind the branch that your pull request will be merged into (in this case HTBox:master). When you branch gets behind, you increase the chances of having merge conflicts in your pull request. Keeping your branch up to date is actually fairly simple but not entirely obvious. A common approach is to click the Update from upstream button in GitHub for Windows. Clicking this button will merge the commits from master into your local branch.

Merging changes from master

This works, but it’s not a very clean. When using this approach, you get these strange “merge remote tracking branch” commits in your branch. I find this can get confusing and messy pretty quick as these additional commits make it difficult to read through your commit history to understand the changes you made in this branch. It is also strange to see a commit with your name on it that doesn’t actually relate to any real changes you made to the code.
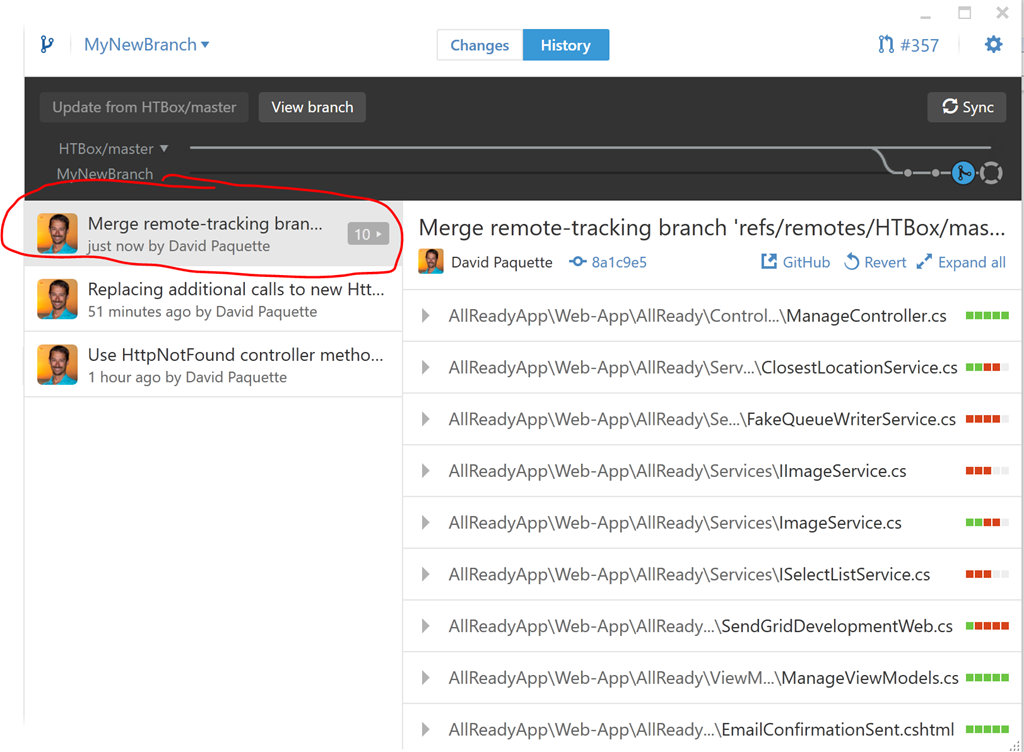
Merge commit message

I find a better approach is to do a git rebase. Don’t be scared by the new terminology. A rebase is the process of rewinding the changes you made, updating the branch to include the missing commits from another branch, then replaying your commits after those. In my mind this more logically mirrors what you actually want for your pull request. This should also make your changes much easier to review.

Before you can rebase, you first need to fetch the changes from the upstream (in this case HTBox). Run git fetch HTBox. The fetch itself won’t change your branch. It simply ensures that your local git repo has a copy of the changes from HTBox/master. Next, execute git rebase HTBox/master. This will rewind all your changes and then replay them after the changes that happened to HTBox/master.

git rebase

Luckily, we had no merge conflicts to deal with here so we can proceed with pushing our changes up to GitHub with the git push –f command.
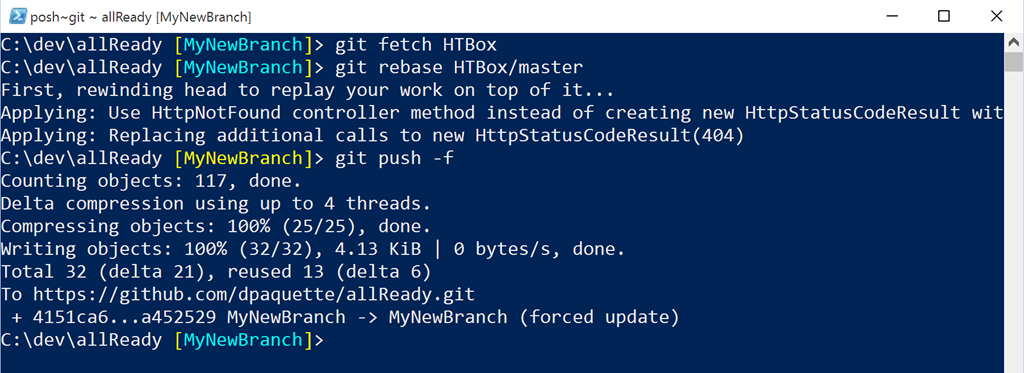
Force push

Now when we look at this branch on GitHub, we can see that it is no longer behind the HTBox/master branch.
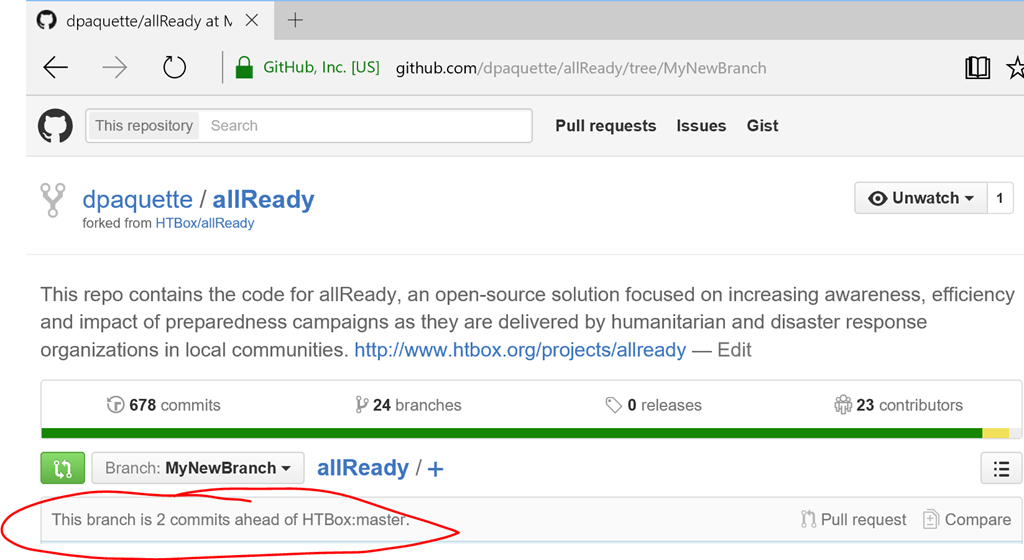
Updated branch

Over time, you will also want to keep your master branch up to date. The process here is the same but you usually don’t need to use the force flag to push. The force flag is only necessary when you have made changes in that branch.

Updating fork

_Caution: _When you rebase, then push –f, you are rewriting the history for your branch. This normally isn’t a problem if you are the only person working on your branch. It can however be a big problem if you are collaborating with another developer on your branch. If you are collaborating with others, the merge approach mentioned earlier (using the Update from button in GitHub for Windows) is a safer option than the rebase option.

Dealing with Merge Conflicts

Dealing with conflicts is the worst part of any source control system, including git. When I run into this problem I use a combination of the command line and the git tooling built-in to Visual Studio. I like to use Visual Studio for this because the visualization used for resolving conflicts is familiar to me.

If a merge conflict occurs during a rebase, git will spew out some info for you.
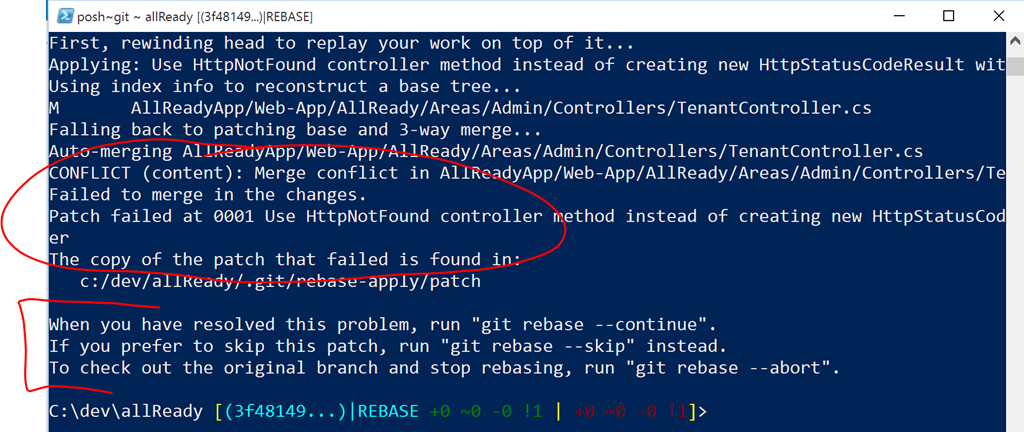
Merge conflict

Don’t panic. What happens here is the rebase stops at the commit where the merge conflict happened. It is now up to you to decide how you want to handle this merge conflict. Once you have completed the merge, you can then continue the rebase by running the git rebase –continue command. Alternatively, you can cancel everything by running the git rebase –abort command.

As I said earlier, I like to jump over to Visual Studio to handle the merge conflicts. In Visual Studio, with the solution file for the project open, open the file that has a conflict.
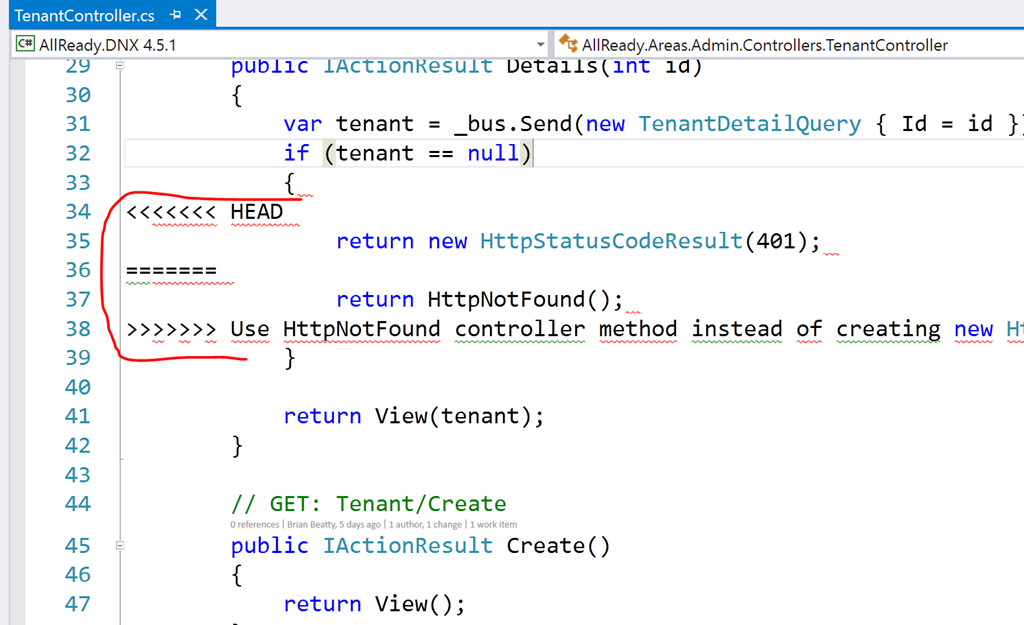
File with conflict

Here, we can see the conflicted area. You could merge it manually here, but there is a much better way. In Visual Studio, open the Team Explorer and select Changes.
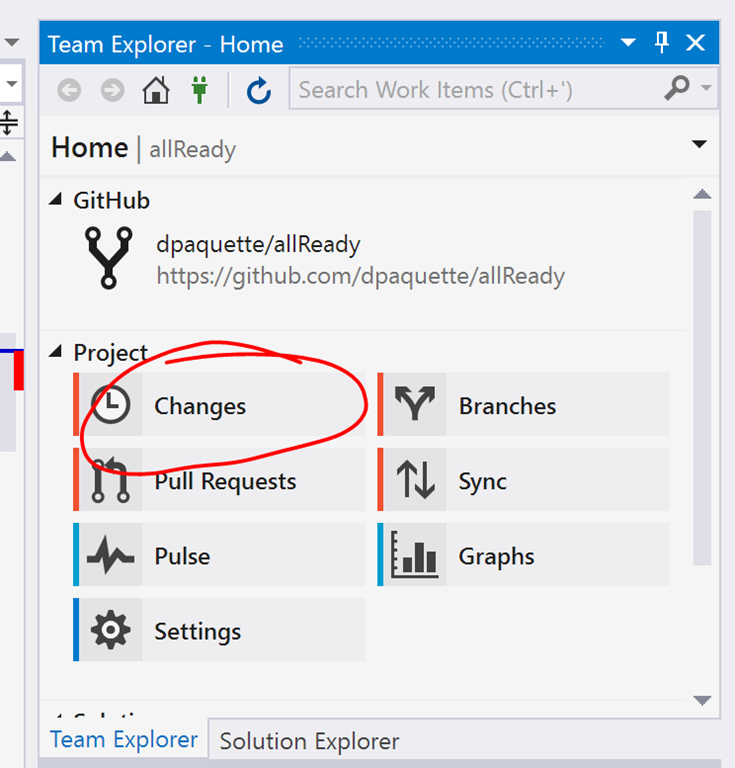
Visual Studio Team Explorer

Visual Studio knows that you are in the middle of a rebase and that you have conflicts.
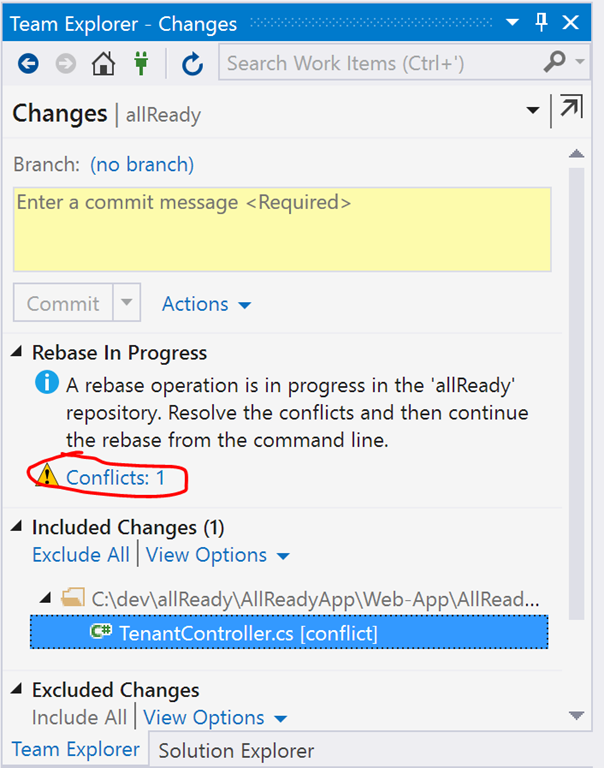
Visual Studio Show Conflicts

Click the Conflicts warning and then click the Merge button to resolve merge conflicts for the conflicted file.
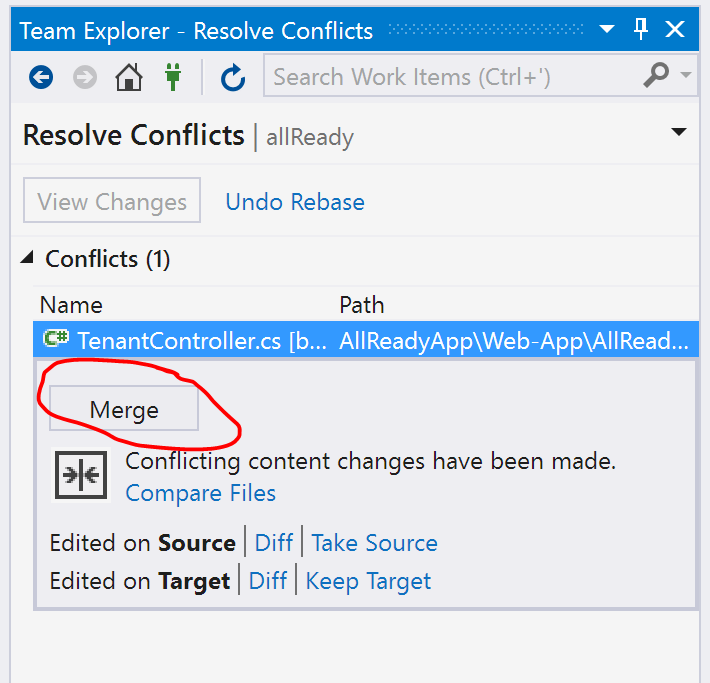
Open merge tool

This will open the Merge window where I can select the changes I want to keep and then click the Accept Merge button.
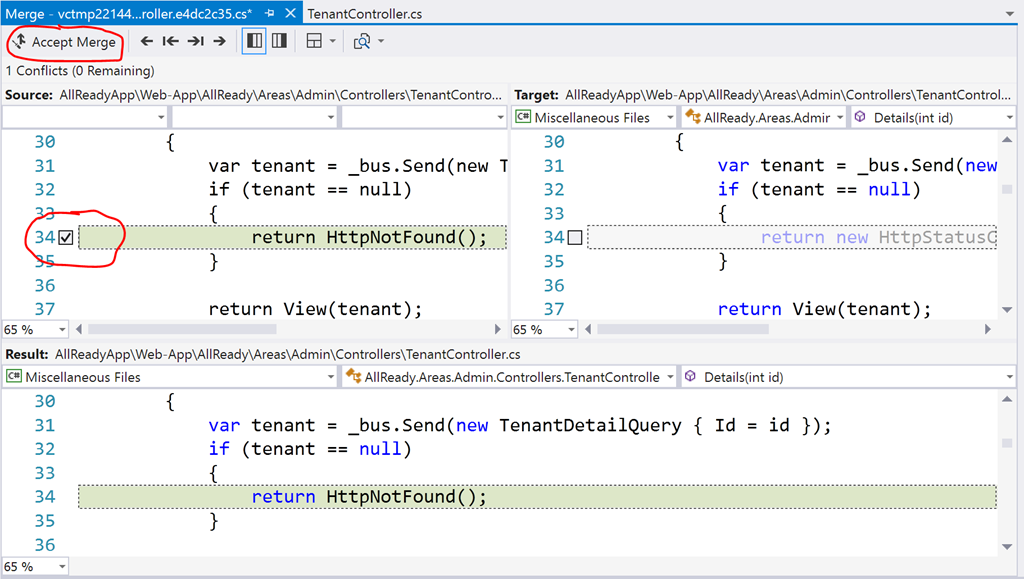
Three way merge tool in Visual Studio

Now, we can continue the rebase operation with git rebase --continue:
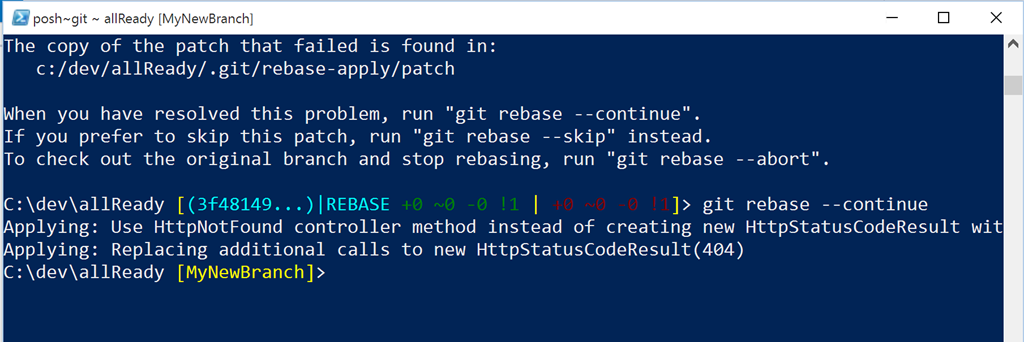
git rebase --continue

Finally, a git push –f to push the changes to GitHub and our merge is complete! See…that wasn’t so bad was it?

Squashing Commits

Some project owners will ask you to squash your commits before they will accept your changes. Squashing is the process of combining all your commits into a single commit. Some project owners like this because it keeps the commit log on the master branch nice and clean with a single commit per pull request. Squashing is the subject of much debate but I won’t get into that here. If you got through the merging you can handle this too.

To squash your commits, start by rebasing as described above. Squashing only works if all your commits are replayed AFTER all the changes in the branch that the pull request will be merged into. Next, rebase again with the interactive (-i) flag, specifying the number of changes you will be squashing using HEAD~x. In my case, that is 2 commits. This will open Notepad with a list of the last _x_ commits and some instructions on how to specify the commits you will be squashing.
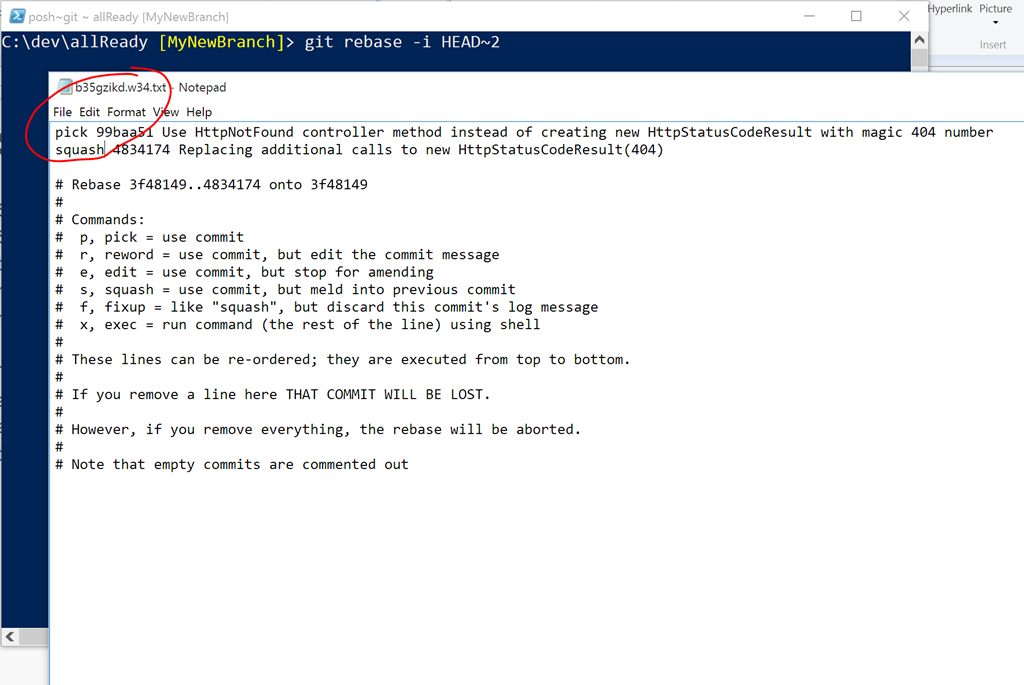
Squashing commits

Edit the file, save it and close it. Git will continue the rebase process and open a second file in Notepad. This file will allow you to modify the commit messages.
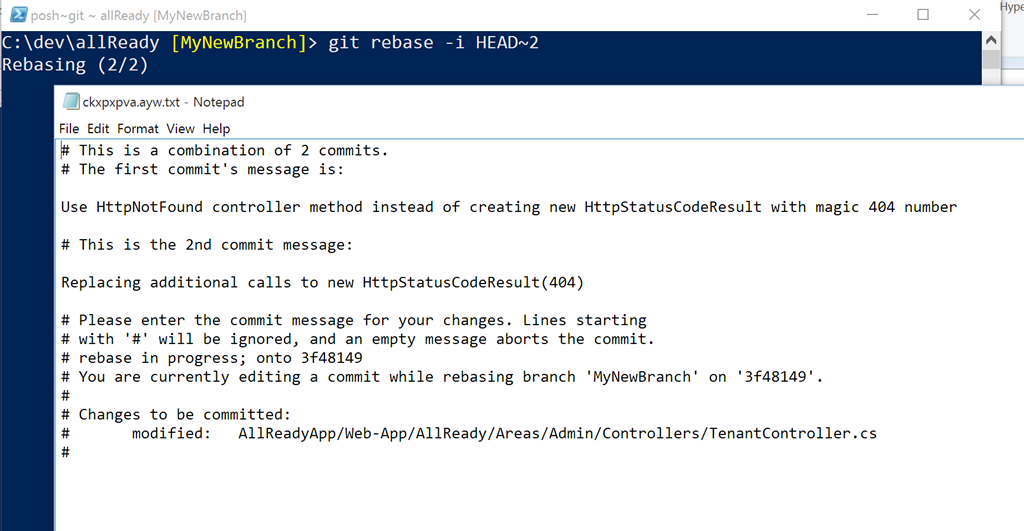
Modify commit messages

I usually leave this file alone and close it. This completes the squashing.
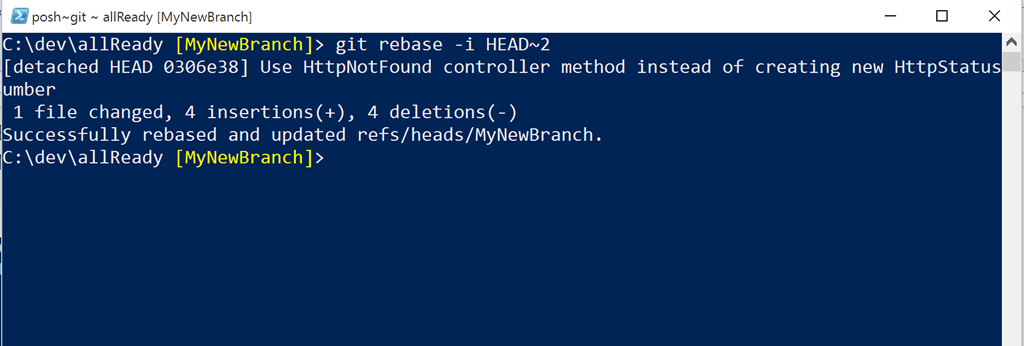
Squash complete

Finally, run the git push –f command to push these changes to GitHub. Your branch (and associated pull request) should now show a single commit with all your changes.
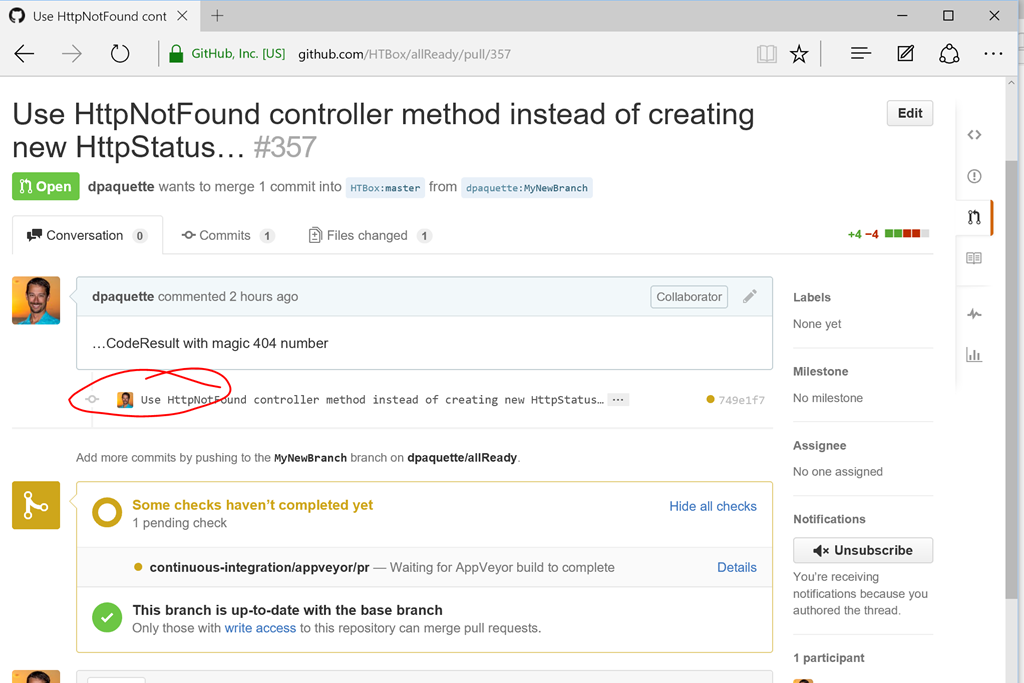
Results of squashing

Pull request successfully merged and closed!
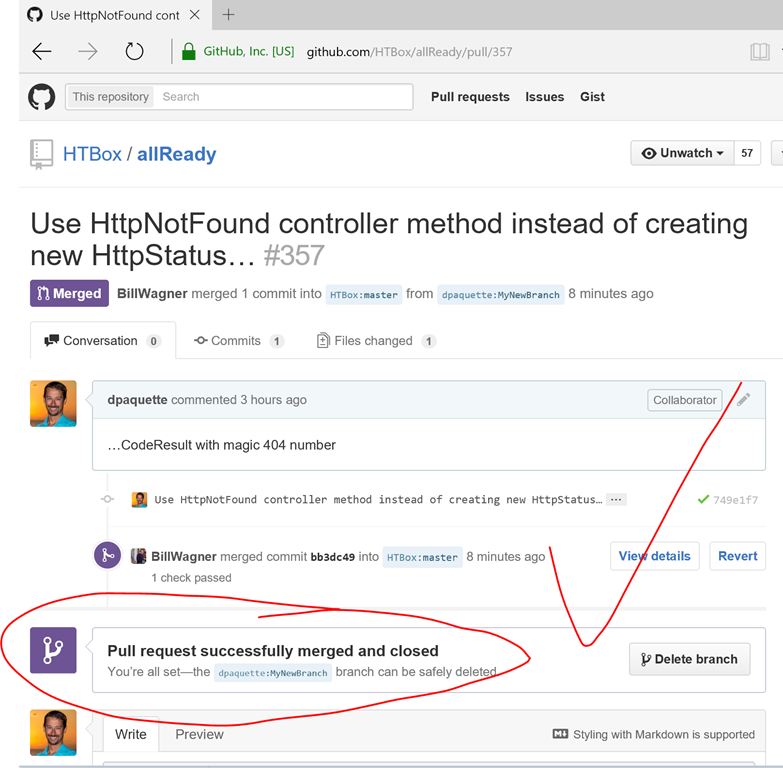
Mission Accomplished

Congrats! You know have the tools you need to handle most scenarios you might encounter when contributing to an open source project on GitHub. It’s time to impress your friends with your new found knowledge of rebasing, merging and squashing! Get out there and start contributing. If you’re looking for a project to get started on, check out the list at http://up-for-grabs.net.
Goodbye Child Actions, Hello View Components

Updated May 22, 2016: Updated to match component invocations changes in ASP.NET Core RC2 / RTM

In previous versions of MVC, we used Child Actions to build reusable components / widgets that consisted of both Razor markup and some backend logic. The backend logic was implemented as a controller action and typically marked with a [ChildActionOnly] attribute. Child actions are extremely useful but as some have pointed out, it is easy to shoot yourself in the foot.

Child Actions do not exist in ASP.NET Core MVC. Instead, we are encouraged to use the new View Component feature to support this use case. Conceptually, view components are a lot like child actions but they are a lighter weight and no longer involve the lifecycle and pipeline related to a controller. Before we get into the differences, let’s take a look at a simple example.

A simple View Component

View components are made up of 2 parts: A view component class and a razor view.

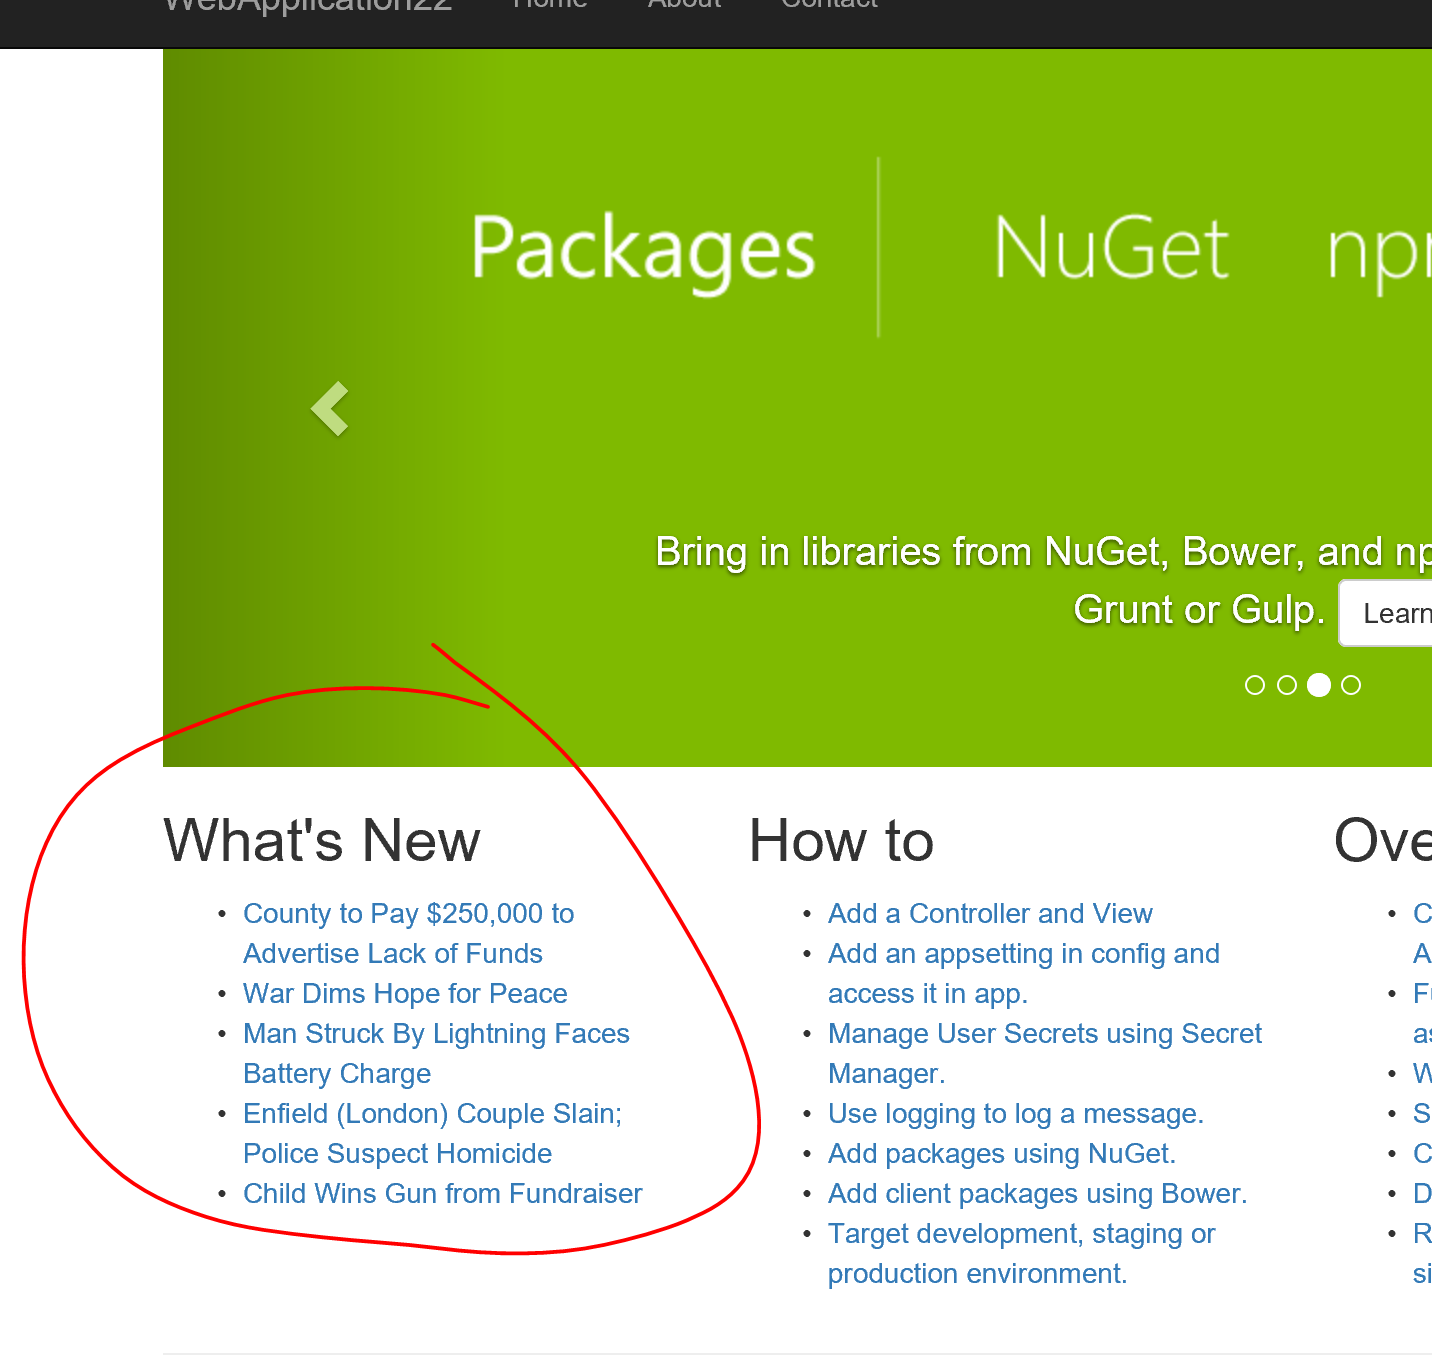
To implement the view component class, inherit from the base ViewComponent and implement an Invoke or InvokeAsync method. This class can be anywhere in your project. A common convention is to place them in a ViewComponents folder. Here is an example of a simple view component that retrieves a list of articles to display in a What’s New section.

namespace MyWebApplication.ViewComponents
{
public class WhatsNewViewComponent : ViewComponent
{
private readonly IArticleService _articleService;

public WhatsNewViewComponent(IArticleService articleService)
{

_articleService = articleService;
}

public IViewComponentResult Invoke(int numberOfItems)
{

var articles = _articleService.GetNewArticles(numberOfItems);
return View(articles);
}
}
}

Much like a controller action, the Invoke method of a view component simply returns a view. If no view name is explicitly specified, the default Views\Shared\Components\ViewComponentName\Default.cshtml is used. In this case, Views\Shared\Components\WhatsNew\Default.cshtml. Note there are a ton of conventions used in view components. I will be covering these in a future blog post.

Views\Shared\Components\WhatsNew\Default.cshtml
@model IEnumerable<Article>

<h2>What's New</h2>
<ul>
@foreach (var article in Model)
{
<li><a asp-controller="Article"
asp-action="View"
asp-route-id="@article.Id">@article.Title</a></li>

}
</ul>

To use this view component, simply call `@Component.InvokeAsync` from any view in your application. For example, I added this to the Home/Index view:

Views\Home\Index.cshtml
<div class="col-md-3">
@await Component.InvokeAsync("WhatsNew", new { numberOfItems = 3})
</div>

The first parameter to `@Component.InvokeAsyncis the name of the view component. The second parameter is an object specifying the names and values of arguments matching the parmeters of theInvokemethod in the view component. In this case, we specified a singleintnamednumberOfItems, which matches theInvoke(int numberOfItems)method of theWhatsNewViewComponent` class.

What's New View Component

How is this different?

So far this doesn’t really look any different from what we had with Child Actions. There are however some major differences here.

No Model Binding

With view components, parameters are passed directly to your view component when you call `@Component.Invoke()or@Component.InvokeAsync()in your view. There is no model binding needed here since the parameters are not coming from the HTTP request. You are calling the view component directly using C#. No model binding means you can have overloadedInvoke` methods with different parameter types. This is something you can’t do in controllers.

No Action Filters

View components don’t take part in the controller lifecycle. This means you can’t add action filters to a view component. While this might sound like a limitation, it is actually an area that caused problems for a lot of people. Adding an action filter to a child action would sometimes have unintended consequences when the child action was called from certain locations.

Not reachable from HTTP

A view component never directly handles an HTTP request so you can’t call directly to a view component from the client side. You will need to wrap the view component with a controller if your application requires this behaviour.

What is available?

Common Properties

When you inherit from the base ViewComponent class, you get access to a few properties that are very similar to controllers:

[ViewComponent]
public abstract class ViewComponent
{
protected ViewComponent();
public HttpContext HttpContext { get; }
public ModelStateDictionary ModelState { get; }
public HttpRequest Request { get; }
public RouteData RouteData { get; }
public IUrlHelper Url { get; set; }
public IPrincipal User { get; }

[Dynamic]
public dynamic ViewBag { get; }
[ViewComponentContext]
public ViewComponentContext ViewComponentContext { get; set; }
public ViewContext ViewContext { get; }
public ViewDataDictionary ViewData { get; }
public ICompositeViewEngine ViewEngine { get; set; }

//...
}

Most notably, you can access information about the current user from the User property and information about the current request from the Request property. Also, route information can be accessed from the RouteData property. You also have the ViewBag and ViewData. Note that the ViewBag / ViewData are shared with the controller. If you set ViewBag property in your controller action, that property will be available in any ViewComponent that is invoked by that controller action’s view.

Dependency Injection

Like controllers, view components also take part in dependency injection so any other information you need can simply be injected to the view component. In the example above, we injected the IArticleService that allowed us to access articles form some remote source. Anything that you could inject into a controller can also be injected into a view component.

Wrapping it up

View components are a powerful new feature for creating reusable widgets in ASP.NET Core MVC. Consider using View Components any time you have complex rendering logic that also requires some backend logic.

Complex Custom Tag Helpers in ASP.NET Core MVC

Updated May 5 2016: Updated code to work with ASP.NET Core RC2

In a previous blog post we talked about how to create a simple tag helper in ASP.NET Core MVC. In today’s post we take this one step further and create a more complex tag helper that is made up of multiple parts.

A Tag Helper for Bootstrap Modal Dialogs

Creating a modal dialog in bootstrap requires some verbose html.

Bootstrap Modal
<div class="modal fade" tabindex="-1" role="dialog">
<div class="modal-dialog">
<div class="modal-content">
<div class="modal-header">
<button type="button" class="close" data-dismiss="modal" aria-label="Close"><span aria-hidden="true">&times;</span></button>
<h4 class="modal-title">Modal title</h4>
</div>
<div class="modal-body">
<p>One fine body&hellip;</p>
</div>
<div class="modal-footer">
<button type="button" class="btn btn-default" data-dismiss="modal">Close</button>
<button type="button" class="btn btn-primary">Save changes</button>
</div>
</div><!-- /.modal-content -->
</div><!-- /.modal-dialog -->
</div><!-- /.modal -->

Using a tag helper here would help simplify the markup but this is a little more complicated than the Progress Bag example. In this case, we have HTML content that we want to add in 2 different places: the <div class="modal-body"></div> element and the <div class="modal-footer"></div> element.

The solution here wasn’t immediately obvious. I had a chance to talk to Taylor Mullen at the MVP Summit ASP.NET Hackathon in November and he pointed me in the right direction. The solution is to use 3 different tag helpers that can communicate with each other through the TagHelperContext.

Ultimately, we want our tag helper markup to look like this:

Bootstrap Modal using a Tag Helper
<modal title="Modal title">
<modal-body>
<p>One fine body&hellip;</p>
</modal-body>
<modal-footer>
<button type="button" class="btn btn-default" data-dismiss="modal">Close</button>
<button type="button" class="btn btn-primary">Save changes</button>
</modal-footer>
</modal>

This solution uses 3 tag helpers: modal, modal-body and modal-footer. The contents of the modal-body tag will be placed inside the <div class="modal-body"></div> while the contents of the <modal-footer> tag will be placed inside the <div class="modal-footer"></div> element. The modal tag helper is the one that will coordinate all this.

Restricting Parents and Children

First things first, we want to make sure that <modal-body> and <modal-footer> can only be placed inside the <modal> tag and that the <modal> tag can only contain those 2 tags. To do this, we set the RestrictChildren attribute on the modal tag helper and the ParentTag property of the HtmlTargetElement attribute on the modal body and modal footer tag helpers:

[RestrictChildren("modal-body", "modal-footer")]
public class ModalTagHelper : TagHelper
{
//...
}

[HtmlTargetElement("modal-body", ParentTag = "modal")]
public class ModalBodyTagHelper : TagHelper
{
//...
}

[HtmlTargetElement("modal-footer", ParentTag = "modal")]
public class ModalFooterTagHelper : TagHelper
{
//...
}

Now if we try to put any other tag in the <modal> tag, Razor will give me a helpful error message.

Restrict children

Getting contents from the children

The next step is to create a context class that will be used to keep track of the contents of the 2 child tag helpers.

public class ModalContext
{
public IHtmlContent Body { get; set; }
public IHtmlContent Footer { get; set; }
}

At the beginning of the ProcessAsync method of the Modal tag helper, create a new instance of ModalContext and add it to the current TagHelperContext:

public override async Task ProcessAsync(TagHelperContext context, TagHelperOutput output)
{

var modalContext = new ModalContext();
context.Items.Add(typeof(ModalTagHelper), modalContext);
//...
}

Now, in the modal body and modal footer tag helpers we will get the instance of that ModalContext via the TagHelperContext. Instead of rendering the output, these child tag helpers will set the the Body and Footer properties of the ModalContext.

[HtmlTargetElement("modal-body", ParentTag = "modal")]
public class ModalBodyTagHelper : TagHelper
{
public override async Task ProcessAsync(TagHelperContext context, TagHelperOutput output)
{

var childContent = await output.GetChildContentAsync();
var modalContext = (ModalContext)context.Items[typeof(ModalTagHelper)];
modalContext.Body = childContent;
output.SuppressOutput();
}
}

Back in the modal tag helper, we call output.GetChildContentAsync() which will cause the child tag helpers to execute and set the properties on the ModalContext. After that, we just set the output as we normally would in a tag helper, placing the Body and Footer in the appropriate elements.

Modal tag helper
public override async Task ProcessAsync(TagHelperContext context, TagHelperOutput output)
{
var modalContext = new ModalContext();
context.Items.Add(typeof(ModalTagHelper), modalContext);

await output.GetChildContentAsync();

var template =
$@"<div class='modal-dialog' role='document'>
<div class='modal-content'>
<div class='modal-header'>
<button type = 'button' class='close' data-dismiss='modal' aria-label='Close'><span aria-hidden='true'>&times;</span></button>
<h4 class='modal-title' id='{context.UniqueId}Label'>{Title}</h4>
</div>
<div class='modal-body'>";

output.TagName = "div";
output.Attributes["role"] = "dialog";
output.Attributes["id"] = Id;
output.Attributes["aria-labelledby"] = $"{context.UniqueId}Label";
output.Attributes["tabindex"] = "-1";
var classNames = "modal fade";
if (output.Attributes.ContainsName("class"))
{
classNames = string.Format("{0} {1}", output.Attributes["class"].Value, classNames);
}
output.Attributes.SetAttribute("class", classNames);
output.Content.AppendHtml(template);
if (modalContext.Body != null)
{
output.Content.AppendHtml(modalContext.Body); //Setting the body contents
}
output.Content.AppendHtml("</div>");
if (modalContext.Footer != null)
{
output.Content.AppendHtml("<div class='modal-footer'>");
output.Content.AppendHtml(modalContext.Footer); //Setting the footer contents
output.Content.AppendHtml("</div>");
}

output.Content.AppendHtml("</div></div>");
}

Conclusion

Composing complex tag helpers with parent / child relationships is fairly straight forward. In my opinion, the approach here is much easier to understand than the “multiple transclusion” approach used to solve the same problem in Angular 1. It would be easy to unit test and as always, Visual Studio provides error messages directly in the HTML editor to guide anyone who is using your tag helper.

You can check out the full source code on the Tag Helper Samples repo.

My Hasty Move to Hexo

As I mentioned in my last post, I had some downtime on my blog after my database mysteriously disappeared.

I have meant for some time now to move my blog to something a little more stable. Wordpress is a fine platform but really overkill for what I need. After moving all my comments to Disqus earlier this year I really had no need at all for a database backend. More importantly, I found it difficult to fine-tune things in Wordpress. Not because it is necessarily difficult to do these things in Wordpress but because have absolutely no interest in learning php.

A Quick Survey

I wanted to move to a statically generated site. I like writing my posts in Markdown and I like the simplicity of a statically generated site. I had a quick look at this site that provides a list of the most popular static site generators.

Jekyll is definitely a great option and seems to be the most popular. At the time, we were using it over at Western Devs. The main problem I have with Jekyll is that it is a bit of a pain to get working on Windows.

I noticed a handy Language filter on the site and picked .NET. There are a few options there but nothing that seems to have any great traction.

Next I picked JavaScript/Node. I am reasonably proficient at JavaScript and I use Node for front-end web dev tasks every day. In that list, Hexo seemed to be the most popular. After polling the group at Western Devs I found out that David Wesst was also using Hexo. This is great for me because Wessty is our resident Node / JavaScript expert. With an expert to fall back on in an emergency situation, I forged ahead in my move to Hexo.

Moving from Wordpress

Hexo provides a plugin for importing from Wordpress. All I did here was followed the steps in the migration documentation. All my posts came across as expected. The only thing that bothered me with the posts is that I lost syntax highlighting on my code blocks. Fixing this was a bit of a manual process, wrapping my code blocks as follows:

{% codeblock lang:html %}
<div>...</div>
{% endcodeblock %}

I did this for my 40 most popular blog posts which covers about 80% of the traffic to my blog. Good enough for me.

Next, I needed to pull down my images. I serve my images on my blog site (I know…I should be hosting this somewhere else like blob storage or imgr). To fix this, I simply used FTP to copy the images from down from my old site and put them in the Hexo source folder. I my case that was the source\wp-content\uploads folder.

Deploying to Azure

I decided to keep my blog hosted in Azure. To deploy to Azure using Hexo, I am using the git deploy method. With this method, anytime I call hexo deploy --generate, Hexo will generate my site and then commit the generated site to a particular branch in my git repository. I then use the Web App continuous deployment hooks in Azure to automatically update the site whenever a change is pushed to that branch.

Some Issues with Hexo

Since I moved my blog over, WesternDevs has also moved to Hexo as part of a big site redesign. Kyle Baley has done a good job of documenting some of the issues we encountered along the way.

I ran into a few more specific issues. First of all, I didn’t want to break all my old links so I kept the same permalinks as my old blog. The challenge with that is that each url ends in .aspx. Weird right…my old blog was Wordpress (php) but before Wordpress I was on geekswithblogs which was using some ASP.NET based blogging engine. So here I am in 2015 with a statically generated blog that is created using Node and is hosted in Azure that for some reason has .aspx file endings. The problem with this was that Aure uses IIS and tries to process the aspx files using the ASP.NET page handlers. Initially everything looked okay. The pages were still being served but some of the characters were not encoded properly. The solution here was to add a web.config to my Hexo source folder. In the web.config I was able to turn off the ASP.NET page handlers and tell IIS that .aspx pages should be treated as static content:

<?xml version="1.0" encoding="UTF-8"?>
<configuration>
<system.webServer>
<handlers>
<remove name="PageHandlerFactory-ISAPI-2.0-64" />
<remove name="PageHandlerFactory-ISAPI-2.0" />
<remove name="PageHandlerFactory-Integrated" />
<remove name="PageHandlerFactory-ISAPI-4.0_32bit" />
<remove name="PageHandlerFactory-Integrated-4.0" />
<remove name="PageHandlerFactory-ISAPI-4.0_64bit" />
</handlers>
<staticContent>
<clientCache cacheControlCustom="public" cacheControlMode="UseMaxAge" cacheControlMaxAge="7.00:00:00" />
<mimeMap fileExtension=".aspx" mimeType="text/html" />
<mimeMap fileExtension=".eot" mimeType="application/vnd.ms-fontobject" />
<mimeMap fileExtension=".ttf" mimeType="application/octet-stream" />
<mimeMap fileExtension=".svg" mimeType="image/svg+xml" />
<mimeMap fileExtension=".woff" mimeType="application/font-woff" />
<mimeMap fileExtension=".woff2" mimeType="application/font-woff2" />
</staticContent>
<rewrite>
<rules>
<rule name="RSSRewrite" patternSyntax="ExactMatch">
<match url="feed" />
<action type="Rewrite" url="atom.xml" appendQueryString="false" />
</rule>
<rule name="RssFeedwithslash">
<match url="feed/" />
<action type="Rewrite" url="atom.xml" appendQueryString="false" />
</rule>
</rules>
</rewrite>
</system.webServer>
</configuration>

In the web.config I also added a rewrite rule to preserve the old RSS feed link.

Triggering a mass migration

While not perfect, I have been happy with my experience migrating to Hexo. Overall, I was able to complete my initial migration within a few hours. Converting older posts to use syntax highlighting took a litte longer but I was able to do that in phases.

I talked about my experience over at Western Devs and this seems to have triggered a few of us to also move our blogs over to Hexo. Hopefully that decision does come back to bite me later…so far it is working out well.

The Case of the Disappearing Database

Something scary happened last week. The database backing my blog disappeared from my Azure account.

Some background: At the time, my blog was a Wordpress site hosted as an Azure Web Site with a MySQL database hosted by Azure Marketplace provider ClearDB.

Series of events

At approximately 12:01 PM I received an alert from Azure that my blog was returning HTTP 500 errors. I quickly checked the site to see what was happening and I was seeing the dreaded “Error establishing a connection to the database” message. I had seen this in the past because I was hosting on a very small MySQL instance. It was not entirely uncommon to exceed the maximum number of connections to my database. The thing is that I had recently upgraded to a larger database instance specifically to avoid this problem.

So…I logged in to the Azure Portal to investigate. To my horror, the MySql database for my blog was nowhere to be found!!! It was gone from the Azure Portal entirely and I couldn’t find it on the ClearDB website either. I am the only person who has access to this Azure account and I know that I didn’t delete it.

I quickly opened an Azure support ticket and contacted ClearDB to see if either company could tell me what happened to my database.

ClearDB actually responded quickly:

Our records indicate that a remote call from Azure at Wed, 25 Nov 2015 12:00:34 -0600 was issued to us to deprovision the database

Ummm WTF! I know I didn’t delete the database. It seems that there is some kind of bug in the integration between Azure and ClearDB. In the mean time, Azure Support eventually replied with the following:

I have reviewed your case and have adjusted the severity to match the request. Sev A is reserved for situations that involve a system, network, server, or critical program down that severely affects production or profitability. This case is set to severity B with updates every 24 hours or sooner.

After nearly a week, I received another update from Azure support:

I have engaged our Engineering Team already to investigate on this issue and currently waiting for an update from them. Our Engineering Team would require 5 to 7 business days to investigate the issue, I will keep you posted as soon as I hear from them.

I am curious to see what the Engineering Team comes back with. I will update this post if / when I hear more.

Restoring from backup

With my database gone, my only choice was to restore from backup. This should have been an easy task. Unfortunately, my automated backup wasn’t actually running as expected and my most recent backup was 7 months old. I had all my individual posts in Live Writer wpost files but republishing those manually would have taken me over a week.

In the end, ClearDB was very helpful and was able to restore my database from their internal backups. As a result, my blog was down for a little under 24 hours.

Lessons learned

These were hard lessons for me to learn because I already knew these things. Problem was that I wasn’t treating my blog like the production system that it is.

  • Don’t trust the cloud-based backups. ClearDB has automated periodic backups but I lost access to those when my database was mysteriously deleted. Have a backup held offsite. That’s what my Wordpress backups were supposed to do for me, which brings me to my second point.

  • Test your backups periodically. I had no idea my backups weren’t working until it was too late.

  • Complexity kills. I have a simple blog and my comments are managed by Disqus. There is really no reason I should need a relational database for this. The MySQL database here has been a constant source of failure on my blog.

Moving on

Once my blog was restored I quickly started a migration over to Hexo. I will blog more about this process shortly.

Realistic Sample Data with GenFu

Last week, I had the opportunity to spend some time hacking with my good friend James Chambers. One of the projects we worked on is his brainchild: GenFu

GenFu is a test and prototype data generation library for .NET apps. It understands different topics - such as “contact details” or “blog posts” and uses that understanding to populate commonly named properties using reflection and an internal database of values or randomly created data.

As a quick sample, I attempted to replace the Sample Data Generator in the ASP.NET5 Music Store app with GenFu. With the right GenFu configuration, it worked like magic and I was able to remove over 700 lines of code!

As part of that process, it became clear that our documentation related to configuring more complex scenarios was slightly lacking. We are working on creating official project documentation. In the mean time, this post can serve as the unofficial documentation for GenFu.

Installing GenFu

GenFu is available via NuGet and can be added to any .NET 4.5, 4.6, or aspnet5 project.

Install-Package GenFu

Basic Usage

Let’s say you have a simple Contact class as follows:

public class Contact
{
public int Id { get; set; }
public string FirstName { get; set; }
public string LastName { get; set; }
public string EmailAdress { get; set; }
public string PhoneNumber { get; set; }

public override string ToString()
{

return $"{Id}: {FirstName} {LastName} - {EmailAdress} - {PhoneNumber}";
}
}

To generate a list of random people using the GenFu defaults, simply call the A.ListOf method:

var people = A.ListOf<Contact>();
foreach (var person in people)
{
Console.WriteLine(person.ToString());
}

This simple console app will output the following:

That was easy, and the data generally looks pretty realistic. The default is to generate 25 objects. If you want more (or less), you can use an overload of the ListOf method to specify the number of objects you want. Okay, but what if the defaults aren’t exactly what you wanted? That’s where GenFu property filler configuration comes in.

Configuring Property Fillers

GenFu has a fluent API that lets you configure exactly how your object’s properties should be filled.

Manually Overriding Property Fillers

Let’s start with a very simple example. In the example above, the Id is populated with random values. That behaviour might be fine for you, but if you are using GenFu to generate random data to seed a database this will probably cause problems. In this case we would want the Id property to be always set to 0 so the database can automatically generate unique ids.

A.Configure<Contact>()
.Fill(c => c.Id, 0);

var people = A.ListOf<Contact>();

Now all the Ids are 0 and the objects would be safe to save to a database:

Another option is to use a method to fill a property. This can be a delegate or any other method that returns the correct type for the property you are configuring:

var i = 1;

A.Configure<Contact>()
.Fill(c => c.Id, () => { return i++; });

With that simple change, we now have sequential ids. Magic!

There is also an option that allows you to configure a property based on other properties of the object. For example, if you wanted to create an email address that matched the first name/last name you could do the following. Also, notice how you can chain together multiple property configurations.

A.Configure<Contact>()
.Fill(c => c.Id, 0)
.Fill(c => c.EmailAdress,
c => { return string.Format("{0}.{1}@zombo.com", c.FirstName, c.LastName); });\

This can be simplified greatly by using string interpolation in C#6.

A.Configure<Contact>()
.Fill(c => c.Id, 0)
.Fill(c => c.EmailAdress,
c => $"{c.FirstName}.{c.LastName}@zombo.com");

Property Filler Extension Methods

In some cases, you might want to give GenFu hints about how to fill a property. For this there is a set of With* and As* extension methods available. For example, if you wanted an integer property to be filled with values within a particular range:

A.Configure<Contact>()
.Fill(c => c.Age).WithinRange(18, 67);

IntelliSense will show you the list of available extensions based on the type of the property you are configuring.

“IntelliSense showing extensions for a String property”

Extensions are available for String, DateTime, Integer, Short, Decimal, Float and Double types.

WithRandom

In some situations, you might want to fill a property with a random value from a given list of values. A simple example of this might be a boolean value where you want approximately 2/3rds of the values to be true and 1/3 to be false. You could accomplish this using the WithRandom extension as follows:

A.Configure<Contact>()
.Fill(c => c.IsRegistered)
.WithRandom(new bool[] { true, true, false });

The WithRandom method is also useful for wiring up object graphs. Imagine the following model classes:

public class IncidentReport
{
public int Id { get; set; }
public string Description { get; set; }
public DateTime ReportedOn { get; set; }
public Contact ReportedBy { get; set; }
}

public class Contact
{
public int Id { get; set; }
public string FirstName { get; set; }
public string LastName { get; set; }
public string EmailAdress { get; set; }
public string PhoneNumber { get; set; }
}

We could use GenFu to generate 1,000 IncidentReports that were reported by 100 different Contacts as follows:

var contacts = A.ListOf<Contact>(100);

A.Configure<IncidentReport>()
.Fill(r => r.ReportedBy)
.WithRandom(contacts);

var incidentReports = A.ListOf<IncidentReport>(1000);

Wrapping it up

That covers the basics and you are now on your way to becoming a GenFu master. In a future post we will cover how to extend GenFu by writing your own re-usable property fillers. In the mean time, give GenFu a try and let us know what you think.