Authorize Resource Tag Helper for ASP.NET Core

In my previous blog post, I wrote an Authorize tag helper that made it simple to use role and policy based authorization in Razor Views. In this blog post, we will take this one step further and build a tag helper for resource-based authorization.

Resource-Based Authorization

Using the IAuthorizationService in ASP.NET Core, it is easy to implement an authorization strategy that depends not only on properties of the User but also depends on the resource being accessed. To learn how resource-based authorization works, take a look at the well written offical documentation.

Once you have defined your authorization handlers and setup any policies in Startup.ConfigureServices, applying resource-based authorization is a matter of calling one of two overloads of the AuthorizeAsync method on the IAuthorizationService.

Task<AuthorizationResult> AuthorizeAsync(ClaimsPrincipal user,
object resource,
string policyName)
;


Task<AuthorizationResult> AuthorizeAsync(ClaimsPrincipal user,
object resource,
IAuthorizationRequirement requirements)
;

One method takes in a policy name while the other takes in an IAuthorizationRequirement. The resulting AuthorizationResult has a Succeeded boolean that indicates whether or not the user meets the requirements for the specified policy. Using the IAuthorizationService in a controller is easy enough. Simply inject the service into the controller, call the method you want to call and then check the result.

public async Task<IActionResult> Edit(int id)
{
    var document = _documentContext.Find(documentId);

    var authorizationResult = await _authorizationService.AuthorizeAsync(User, Document, "EditDocument");

    if (authorizationResult.Succeeded)
    {
        return View(document);
    }    
    else
    {
        return new ChallengeResult();
    }
}

Using this approach, we can easily restrict which users can edit specific documents as defined by our EditDocument policy. For example, we might limit editing to only users who originally created the document.

Where things start to get a little ugly is if we want to render a UI element based on resource-based authorization. For example, we might only want to render the edit button for a document if the current user is actually authorized to edit that document. Out of the box, this would require us to inject the IAuthorizationService in the Razor view and use it like we did in the controller action. The approach works, but the Razor code will get ugly really fast.

Authorize Resource Tag Helper

Similar to the Authorize Tag Helper from the last blog post, this Authorize Resource Tag Helper will make it easy to show or hide blocks of HTML by evaluating authorization rules.

Resource-Based Policy Authorization

Let’s assume we have a named “EditDocument” that requires a user to be the original author of a Document in order to edit the document. With the authorize resource tag helper, specify the resource instance using the asp-authorize-resource attribute and the policy name using the asp-policy attribute. Here is an example where Model is an instance of a Document

<a href="#" asp-authorize-resource="Model" 
asp-policy="EditDocument" class="glyphicon glyphicon-pencil"></a>

If the user meets the requirments for the “EditDocument” policy and the specified resource, then the block of HTML will be sent to the browser. If the requirements are not met, the tag helper will suppress the output of that block of HTML. The tag helper can be applied to any HTML element.

Resource-Based Requirement Authorization

Instead of specifying a policy name, authorization can be evaluated by specifying an instance of an IAuthorizationRequirement. When using requirements directly instead of policies, specify the requirement using the asp-requirement attribute.

<a href="#" asp-authorize-resource="document"
asp-requirement="Operations.Delete"
class="glyphicon glyphicon-trash text-danger">

</a>

If the user meets Operations.Delete requirement for the specified resource, then the block of HTML will be sent to the browser. If the requirement is not met, the tag helper will suppress the output of that block of HTML. The tag helper can be applied to any HTML element.

Implementation Details

The authorize resource tag helper itself is fairly simple. The implementation will likely evolve after this blog post so you can check out the latest version here.

The tag helper needs an instance of the IHttpContextAccessor to get access to the current user and an instance of the IAuthorizationService. These are injected into the constructor. In the ProcessAsync method, either the specified Policy or the specified Requirement are passed in to the IAuthorizationService along with the resource.

[HtmlTargetElement(Attributes = "asp-authorize-resource,asp-policy")]
[HtmlTargetElement(Attributes = "asp-authorize-resource,asp-requirement")]
public class AuthorizeResourceTagHelper : TagHelper
{
private readonly IAuthorizationService _authorizationService;
private readonly IHttpContextAccessor _httpContextAccessor;

public AuthorizeResourceTagHelper(IHttpContextAccessor httpContextAccessor, IAuthorizationService authorizationService)
{

_httpContextAccessor = httpContextAccessor;
_authorizationService = authorizationService;
}

/// <summary>
/// Gets or sets the policy name that determines access to the HTML block.
/// </summary>
[HtmlAttributeName("asp-policy")]
public string Policy { get; set; }

/// <summary>
/// Gets or sets a comma delimited list of roles that are allowed to access the HTML block.
/// </summary>
[HtmlAttributeName("asp-requirement")]
public IAuthorizationRequirement Requirement { get; set; }


/// <summary>
/// Gets or sets the resource to be authorized against a particular policy
/// </summary>
[HtmlAttributeName("asp-authorize-resource")]
public object Resource { get; set; }

public override async Task ProcessAsync(TagHelperContext context, TagHelperOutput output)
{

if (Resource == null)
{
throw new ArgumentException("Resource cannot be null");
}
if (string.IsNullOrWhiteSpace(Policy) && Requirement == null)
{
throw new ArgumentException("Either Policy or Requirement must be specified");

}
if (!string.IsNullOrWhiteSpace(Policy) && Requirement != null)
{
throw new ArgumentException("Policy and Requirement cannot be specified at the same time");
}

AuthorizationResult authorizeResult;

if (!string.IsNullOrWhiteSpace(Policy))
{
authorizeResult = await _authorizationService.AuthorizeAsync(_httpContextAccessor.HttpContext.User, Resource, Policy);
}
else if (Requirement != null)
{

authorizeResult =
await _authorizationService.AuthorizeAsync(_httpContextAccessor.HttpContext.User, Resource,
Requirement);
}
else
{
throw new ArgumentException("Either Policy or Requirement must be specified");
}

if (!authorizeResult.Succeeded)
{
output.SuppressOutput();
}
}

Note that either a policy or a requirement must be specified along with a resource, but you can’t specify both a policy AND a requirement. Most of the code in the ProcessAsync method is checking the argument values to make sure a valid combination was used.

Try it out

You can see the authorize resource tag helper in action on my tag helper samples site here. The sample site contains the examples listed in this blog post and also provides a way to log in as different users to test different scenarios.

The authorize resource tag helper is also available on NuGet so you can use it in your own ASP.NET Core application.

dotnet add package TagHelperSamples.Authorization

Let me know what you think. Would you like to see this tag helper including in the next release of ASP.NET Core?

NOTE: If you choose to use the authorize resource tag helper in your application, you should remember that hiding a section of HTML is not enough to fully secure your application. You also need to make sure that resource-based authorization is applied to any related controllers and action methods.

What’s Next?

There is one more authorization scenario related to supporting different authorization schemes that I hope to cover. Watch out for that in a future blog post. Also, this tag helper project is all open source so feel free to jump in on GitHub.
Authorize Tag Helper for ASP.NET Core

In ASP.NET Core, it’s easy to control access to Controllers and Action Methods using the [Authorize] attribute. This attribute provides a simple way to ensure only authorized users are able to access certain parts of your application. While the [Authorize] attribute makes it easy to control authorization for an entire page, the mechanism for controlling access to a section of a page is a little clumsy, involving the use of a the IAuthorizationService and writing C# based if blocks in your Razor code.

In this blog post, we build an Authorize tag helper that makes it easy to control access to any block HTML in a Razor view.

Authorize Tag Helper

The basic idea of this tag helper is to provide similar functionality to the [Authorize] attribute and it’s associated action filter in ASP.NET Core MVC. The authorize tag helper will provide the same options as the [Authorize] attribute and the implementation will be based on the authorize filter. In the MVC framework, the [Authorize] attribute provides data such as the names of roles and policies while the authorize filter contains the logic to check for roles and policies as part of the request pipeline. Let’s walk through the most common scenarios.

Simple Authorization

In it’s simplest form, adding the [Authorize] attribute to a controller or action method will limit access to that controller or action method to users who are authenticated. That is, only users who are logged in will be able to access those controllers or action methods.

With the Authorize tag helper, we will implement a similar behaviour. Adding the asp-authorize attribute to any HTML element will ensure that only authenticated users can see that that block of HTML.

<div asp-authorize class="panel panel-default">
<div class="panel-heading">Welcome !!</div>
<div class="panel-body">
If you're logged in, you can see this section
</div>
</div>

If a user is not authenticated, the tag helper will suppress the output of that entire block of HTML. That section of HTML will not be sent to the browser.

Role Based Authorization

The [Authorize] attribute provides an option to specify the role that a user must belong to in order to access a controller or action method. For example, if a user must belong to the Admin role, we would add the [Authorize] attribute and specify the Roles property as follows:

[Authorize(Roles = "Admin")]
public class AdminController : Controller
{
//Action methods here
}

The equivalent using the Authorize tag helper would be to add the asp-authorize attribute to an HTML element and then also add the asp-roles attribute specifying the require role.

<div asp-authorize asp-roles="Admin" class="panel panel-default">
<div class="panel-heading">Admin Section</div>
<div class="panel-body">
Only admin users can see this section. Top secret admin things go here.
</div>
</div>

You can also specify a comma separated list of roles, in which case the HTML would be rendered if the user was a member of any of the roles specified.

Policy Based Authorization

The [Authorize] attribe also provides an option to authorize users based on the requirements specified in a Policy. You can learn more about the specifics of this approach by reading the offical docs on Claims-Based Authorization and Custom-Policy Based Authorization. Policy based authorization is applied by specifying Policy property for the [Authorize] attribute as follows:

[Authorize(Policy = "Seniors")]
public class AdminController : Controller
{
//action methods here
}

This assumes a policy named Seniors was defined at startup. For example:

services.AddAuthorization(o =>
{
o.AddPolicy("Seniors", p =>
{
p.RequireAssertion(context =>
{
return context.User.Claims
.Any(c => c.Type == "Age" && Int32.Parse(c.Value) >= 65);
});
});

}
);

The equivalent using the Authorize tag helper would be to add the asp-authorize attribute to an HTML element and then also add the asp-policy attribute specifying the policy name.

<div asp-authorize asp-policy="Seniors" class="panel panel-default">
<div class="panel-heading">Seniors Only</div>
<div class="panel-body">
Only users age 65 or older can see this section. Early bird dinner coupons go here.
</div>
</div>

Combining Role and Policy Based Authorization

You can combine the role based and policy based approaches by specifying both the asp-roles and asp-policy attributes. This has the effect of requiring that the user meets the requiremnts for both the role and the policy. For example, the following would require that the usere were both a member of the Admin role and meets the requirements defined in the Seniors policy.

<div asp-authorize asp-roles="Admin" asp-policy="Seniors" class="panel panel-default">
<div class="panel-heading">Admin Seniors Only</div>
<div class="panel-body">
Only users who have both the Admin role AND are age 65 or older can see this section.
</div>
</div>

Implementation Details

The Authorize tag helper itself is fairly simple. The implementation will likely evolve after this blog post so you can check out the latest version here.

The tag helper implements the IAuthorizeData interface. This is the interface implemented by the Authorize attribute in ASP.NET Core. In the ProcessAsync method, the properties of IAuthorizeData are used to create an effective policy that is then evaluated against the current HttpContext. If the policy does not succeed, then the output of the tag helper is supressed. Remember that supressing the output of a tag helper means that the HTML for that element, including it’s children, will be NOT sent to the client.

[HtmlTargetElement(Attributes = "asp-authorize")]
[HtmlTargetElement(Attributes = "asp-authorize,asp-policy")]
[HtmlTargetElement(Attributes = "asp-authorize,asp-roles")]
[HtmlTargetElement(Attributes = "asp-authorize,asp-authentication-schemes")]
public class AuthorizationPolicyTagHelper : TagHelper, IAuthorizeData
{
private readonly IAuthorizationPolicyProvider _policyProvider;
private readonly IPolicyEvaluator _policyEvaluator;
private readonly IHttpContextAccessor _httpContextAccessor;

public AuthorizationPolicyTagHelper(IHttpContextAccessor httpContextAccessor, IAuthorizationPolicyProvider policyProvider, IPolicyEvaluator policyEvaluator)
{
_httpContextAccessor = httpContextAccessor;
_policyProvider = policyProvider;
_policyEvaluator = policyEvaluator;
}

/// <summary>
/// Gets or sets the policy name that determines access to the HTML block.
/// </summary>
[HtmlAttributeName("asp-policy")]
public string Policy { get; set; }

/// <summary>
/// Gets or sets a comma delimited list of roles that are allowed to access the HTML block.
/// </summary>
[HtmlAttributeName("asp-roles")]
public string Roles { get; set; }

/// <summary>
/// Gets or sets a comma delimited list of schemes from which user information is constructed.
/// </summary>
[HtmlAttributeName("asp-authentication-schemes")]
public string AuthenticationSchemes { get; set; }

public override async Task ProcessAsync(TagHelperContext context, TagHelperOutput output)
{
var policy = await AuthorizationPolicy.CombineAsync(_policyProvider, new[] { this });

var authenticateResult = await _policyEvaluator.AuthenticateAsync(policy, _httpContextAccessor.HttpContext);

var authorizeResult = await _policyEvaluator.AuthorizeAsync(policy, authenticateResult, _httpContextAccessor.HttpContext, null);

if (!authorizeResult.Succeeded)
{
output.SuppressOutput();
}
}
}

The code in the ProcessAsync method is based on the AuthorizeFilter from ASP.NET Core MVC.

Try it out

You can see the Authorize tag helper in action on my tag helper samples site here. The sample site contains the examples listed in this blog post and also provides a way to log in as different users to test different scenarios.

The Authorize tag helper is also available on NuGet so you can use it in your own ASP.NET Core application.

dotnet add package TagHelperSamples.Authorization

Let me know what you think. Would you like to see this tag helper included in the next release of ASP.NET Core?

What’s Next?

If you choose to use the Authorize tag helper in your application, you should remember that hiding a section of HTML is not enough to fully secure your application. You also need to make sure that authorization is applied to any related controllers and action methods. The Authorize tag helper is meant to be used in conjugtion with the [Authorize] attribute, not as a replacement for it.

There are a couple more scenarios I would like to go through and I will address those in a future post. One of those is supporting different Authorization Schemes and the other resource based authorization. Of course, this project is all open source so feel free to jump in on GitHub.
Nov 28 2017 - Updated: Added blog post for Authorize Resource Tag Helper

Integration Testing with Entity Framework Core and SQL Server

Entity Framework Core makes it easy to write tests that execute against an in-memory store. Using an in-memory store is convenient since we don’t need to worry about setting up a relational database. It also ensures our unit tests run quickly so we aren’t left waiting hours for a large test suite to complete.

While Entity Framework Core’s in-memory store works great for many scenarios, there are some situations where it might be better to run our tests against a real relational database. Some examples include when loading entities using raw SQL or when using SQL Server specific features that can not be tested using the in-memory provider. In this case, the tests would be considered an integration test since we are no longer testing our Entity Framework context in isolation. We are testing how it will work in the real world when connected to SQL Server.

The Sample Project

For this example, I used the following simple model and DbContext classes.

public class Monster
{
public int Id { get; set; }
public string Name { get; set; }
public bool IsScary { get; set; }
public string Colour { get; set; }
}
public class MonsterContext : DbContext
{
public MonsterContext(DbContextOptions<MonsterContext> options)
: base(options)
{

}

public DbSet<Monster> Monsters { get; set; }
}

In an ASP.NET Core application, the context is configured to use SQL Server in the Startup.ConfigureServices method.

services.AddDbContext<MonsterContext>(options =>
{
options.UseSqlServer("DefaultConnection");
});

The DefaultConnection is defined in appsettings.json which is loaded at startup.

{
"ConnectionStrings": {
"DefaultConnection": "Server=(localdb)\\mssqllocaldb;Database=monsters_db;Trusted_Connection=True;MultipleActiveResultSets=true"
}
}

The MonsterContext is also configured to use Migrations which were initialized using the dotnet ef migrations add InitialCreate command. For more on Entity Framework Migrations, see the official tutorial.

As a simple example, I created a query class that loads scary monsters from the database using a SQL query instead of querying the Monsters DbSet directly.

public class ScaryMonstersQuery
{
private MonsterContext _context;

public ScaryMonstersQuery(MonsterContext context)
{

_context = context;
}

public IEnumerable<Monster> Execute()
{

return _context.Monsters
.FromSql("SELECT Id, Name, IsScary, Colour FROM Monsters WHERE IsScary = {0}", true);
}

}

To be clear, a better way to write this query is _context.Monster.Where(m => m.IsScary == true), but I wanted a simple example. I also wanted to use FromSql because it is inherently difficult to unit test. The FromSql method doesn’t work with the in-memory provider since it requires a relational database. It is also an extension method which means we can’t simply mock the context using a tool like Moq. We could of course create a wrapper service that calls the FromSql extension method and mock that service but this only shifts the problem. The wrapper approach would allow us to ensure that FromSql is called in the way we expect it to be called but it would not be able to ensure that the query will actually run successfully and return the expected results.

An integration test is a good option here since it will ensure that the query runs exactly as expected against a real SQL Server database.

The Test

I used xunit as the test framework in this example. In the constructor, which is the setup method for any tests in the class, I configure an instance of the MonsterContext connecting to a localdb instance using a database name containing a random guid. Using a guid in the database name ensures the database is unique for this test. Uniqueness is important when running tests in parallel because it ensures these tests won’t impact any other tests that aer currently running. After creating the context, a call to _context.Database.Migrate() creates a new database and applies any Entity Framework migrations that are defined for the MonsterContext.

public class SimpleIntegrationTest : IDisposable
{
MonsterContext _context;

public SimpleIntegrationTest()
{

var serviceProvider = new ServiceCollection()
.AddEntityFrameworkSqlServer()
.BuildServiceProvider();

var builder = new DbContextOptionsBuilder<MonsterContext>();

builder.UseSqlServer($"Server=(localdb)\\mssqllocaldb;Database=monsters_db_{Guid.NewGuid()};Trusted_Connection=True;MultipleActiveResultSets=true")
.UseInternalServiceProvider(serviceProvider);

_context = new MonsterContext(builder.Options);
_context.Database.Migrate();

}

[Fact]
public void QueryMonstersFromSqlTest()
{

//Add some monsters before querying
_context.Monsters.Add(new Monster { Name = "Dave", Colour = "Orange", IsScary = false });
_context.Monsters.Add(new Monster { Name = "Simon", Colour = "Blue", IsScary = false });
_context.Monsters.Add(new Monster { Name = "James", Colour = "Green", IsScary = false });
_context.Monsters.Add(new Monster { Name = "Imposter Monster", Colour = "Red", IsScary = true });
_context.SaveChanges();

//Execute the query
ScaryMonstersQuery query = new ScaryMonstersQuery(_context);
var scaryMonsters = query.Execute();

//Verify the results
Assert.Equal(1, scaryMonsters.Count());
var scaryMonster = scaryMonsters.First();
Assert.Equal("Imposter Monster", scaryMonster.Name);
Assert.Equal("Red", scaryMonster.Colour);
Assert.True(scaryMonster.IsScary);
}

public void Dispose()
{

_context.Database.EnsureDeleted();
}
}

The actual test itself happens in the QueryMonstersFromSqlTest method. I start by adding some sample data to the database. Next, I create and execute the ScaryMonstersQuery using the context that was created in the setup method. Finally, I verify the results, ensuring that the expected data is returned from the query.

The last step is the Dispose method which in xunit is the teardown for any tests in this class. We don’t want all these test databases hanging around forever so this is the place to delete the database that was created in the setup method. The database is deleted by calling _context.Database.EnsureDeleted().

Use with Caution

These tests are slow! The very simple example above takes 13 seconds to run on my laptop. My advice here is to use this sparingly and only when it really adds value for your project. If you end up with a large number of these integration tests, I would consider splitting the integration tests into a separate test suite and potentially running them on a different schedule than my unit test suite (e.g. Nightly instead of every commit).

The Code

You can browse or download the source on GitHub.

Creating a New View Engine in ASP.NET Core

Earlier in November, the ASP.NET Monsters had the opportunity to take part in the ASP.NET Core hackathon at the Microsoft MVP Summit. In past years, we have used the hackathon as an opportunity to spend some time working on GenFu. This year, we wanted to try something a little different.

The Crazy Idea

A few months ago, we had Taylor Mullen on The Monsters Weekly to chat about Razor in ASP.NET Core. At some point during that interview, it was pointed that MVC is designed in a way that a new view engine could easily be plugged into the framework. It was also noted that implementing a view engine is a really big job. This got us to thinking…what if we could find an existing view engine of some sort. How easy would it be to get actually put a new view engine in MVC?

And so, that was our goal for the hackathon. Find a way to replace Razor with an alternate view engine in a single day of hacking.

Finding a Replacement

We wanted to pick something that in no way resembled Razor. Simon suggested Pug (previously known as Jade), a popular view template engine used in Express. In terms of syntax, Pug is about as different from Razor as it possibly could be. Pug uses whitespace to indicate nesting of elements and does away with angle brackets all together. For example, the following template:

div
a(href='google.com') Google

would generate this HTML:

<div>
<a href="google.com">Google</a>
</div>

Calling Pug from ASP.NET Core

The first major hurdle for us was figuring out a way to compile pug templates from within an ASP.NET Core application. Pug is a JavaScript based template engine and we only had a single day to pull this off so a full port of the engine to C# was not feasible.

Our first thought was to use Edgejs to call Pug’s JavaScript compile function. Some quick prototyping showed us that this worked but Edgejs doesn’t have support for .NET Core. This lead us to explore the JavaScriptServices packages created by the ASP.NET Core team. Specifically the Node Services package which allows us to easily call out to a JavaScript module from within an ASP.NET Core application.

To our surprise, this not only worked, it was also easy! We created a very simple file called pugcompile.js.

var pug = require('pug');

module.exports = function (callback, viewPath, model) {
var pugCompiledFunction = pug.compileFile(viewPath);
callback(null, pugCompiledFunction(model));
};

Calling this JavaScript from C# is easy thanks to the Node Services package. Assuming model is the view model we want to bind to the template and mytemplate.pug is the name of the file containing the pug template:

var html = await _nodeServices.InvokeAsync<string>("pugcompile", "mytemplate.pug", model);

Now that we had proven this was possible, it was time to integrate this with MVC by creating a new MVC View Engine.

Creating the Pugzor View Engine

We decided to call our view engine Pugzor which is a combination of Pug and Razor. Of course, this doesn’t really make much sense since our view engine really has nothing to do with Razor but naming is hard and we thought we were being funny.

Keeping in mind our goal of implementing a view engine in a single day, we wanted to do this with the simplest way possible. After spending some time digging through the source code for MVC, we determined that we needed to implement the IViewEngine interface as well as implement a custom IView.

The IViewEngine is responsible for locating a view based on a ActionContext and a ViewName. When a controller returns a View, it is the IViewEngine‘s FindView method that is responsible for finding a view based on some convetions. The FindView method returns a ViewEngineResult which is a simple class containing a boolean Success property indicating whether or not a view was found and an IView View property containing the view if it was found.

/// <summary>
/// Defines the contract for a view engine.
/// </summary>
public interface IViewEngine
{
/// <summary>
/// Finds the view with the given <paramref name="viewName"/> using view locations and information from the
/// <paramref name="context"/>.
/// </summary>
/// <param name="context">The <see cref="ActionContext"/>.</param>
/// <param name="viewName">The name of the view.</param>
/// <param name="isMainPage">Determines if the page being found is the main page for an action.</param>
/// <returns>The <see cref="ViewEngineResult"/> of locating the view.</returns>
ViewEngineResult FindView(ActionContext context, string viewName, bool isMainPage);

/// <summary>
/// Gets the view with the given <paramref name="viewPath"/>, relative to <paramref name="executingFilePath"/>
/// unless <paramref name="viewPath"/> is already absolute.
/// </summary>
/// <param name="executingFilePath">The absolute path to the currently-executing view, if any.</param>
/// <param name="viewPath">The path to the view.</param>
/// <param name="isMainPage">Determines if the page being found is the main page for an action.</param>
/// <returns>The <see cref="ViewEngineResult"/> of locating the view.</returns>
ViewEngineResult GetView(string executingFilePath, string viewPath, bool isMainPage);
}

We decided to use the same view location conventions as Razor. That is, a view is located in Views/{ControllerName}/{ActionName}.pug.

Here is a simplified version of the FindView method for the PugzorViewEngine:

public ViewEngineResult FindView(
ActionContext actionContext,
string viewName,
bool isMainPage)

{

var controllerName = GetNormalizedRouteValue(actionContext, ControllerKey);

var checkedLocations = new List<string>();
foreach (var location in _options.ViewLocationFormats)
{
var view = string.Format(location, viewName, controllerName);
if(File.Exists(view))
return ViewEngineResult.Found("Default", new PugzorView(view, _nodeServices));
checkedLocations.Add(view);
}
return ViewEngineResult.NotFound(viewName, checkedLocations);
}

You can view the complete implentation on GitHub.

Next, we created a class called PugzorView which implements IView. The PugzorView takes in a path to a pug template and an instance of INodeServices. The MVC framework calls the IView‘s RenderAsync when it is wants the view to be rendered. In this method, we call out to pugcompile and then write the resulting HTML out to the view context.

public class PugzorView : IView
{
private string _path;
private INodeServices _nodeServices;

public PugzorView(string path, INodeServices nodeServices)
{

_path = path;
_nodeServices = nodeServices;
}

public string Path
{
get
{
return _path;
}
}

public async Task RenderAsync(ViewContext context)
{

var result = await _nodeServices.InvokeAsync<string>("./pugcompile", Path, context.ViewData.Model);
context.Writer.Write(result);
}
}

The only thing left was to configure MVC to use our new view engine. At first, we thought we could easy add a new view engine using the AddViewOptions extension method when adding MVC to the service collection.

services.AddMvc()
.AddViewOptions(options =>
{
options.ViewEngines.Add(new PugzorViewEngine(nodeServices));
});

This is where we got stuck. We can’t add a concrete instance of the PugzorViewEngine to the ViewEngines collection in the Startup.ConfigureServices method because the view engine needs to take part in dependency injection. The PugzorViewEngine has a dependency on INodeServices and we want that to be injected by ASP.NET Core’s dependency injection framework. Luckily, the all knowning Razor master Taylor Mullen was on hand to show us the right way to register our view engine.

The recommended approach for adding a view engine to MVC is to create a custom setup class that implements IConfigureOptions<MvcViewOptions>. The setup class takes in an instance of our IPugzorViewEngine via constructor injection. In the configure method, that view engine is added to the list of view engines in the MvcViewOptions.

public class PugzorMvcViewOptionsSetup : IConfigureOptions<MvcViewOptions>
{
private readonly IPugzorViewEngine _pugzorViewEngine;

/// <summary>
/// Initializes a new instance of <see cref="PugzorMvcViewOptionsSetup"/>.
/// </summary>
/// <param name="pugzorViewEngine">The <see cref="IPugzorViewEngine"/>.</param>
public PugzorMvcViewOptionsSetup(IPugzorViewEngine pugzorViewEngine)
{
if (pugzorViewEngine == null)
{
throw new ArgumentNullException(nameof(pugzorViewEngine));
}

_pugzorViewEngine = pugzorViewEngine;
}

/// <summary>
/// Configures <paramref name="options"/> to use <see cref="PugzorViewEngine"/>.
/// </summary>
/// <param name="options">The <see cref="MvcViewOptions"/> to configure.</param>
public void Configure(MvcViewOptions options)
{
if (options == null)
{
throw new ArgumentNullException(nameof(options));
}

options.ViewEngines.Add(_pugzorViewEngine);
}
}

Now all we need to do is register the setup class and view engine the Startup.ConfigureServices method.

services.AddTransient<IConfigureOptions<MvcViewOptions>, PugzorMvcViewOptionsSetup>();
services.AddSingleton<IPugzorViewEngine, PugzorViewEngine>();

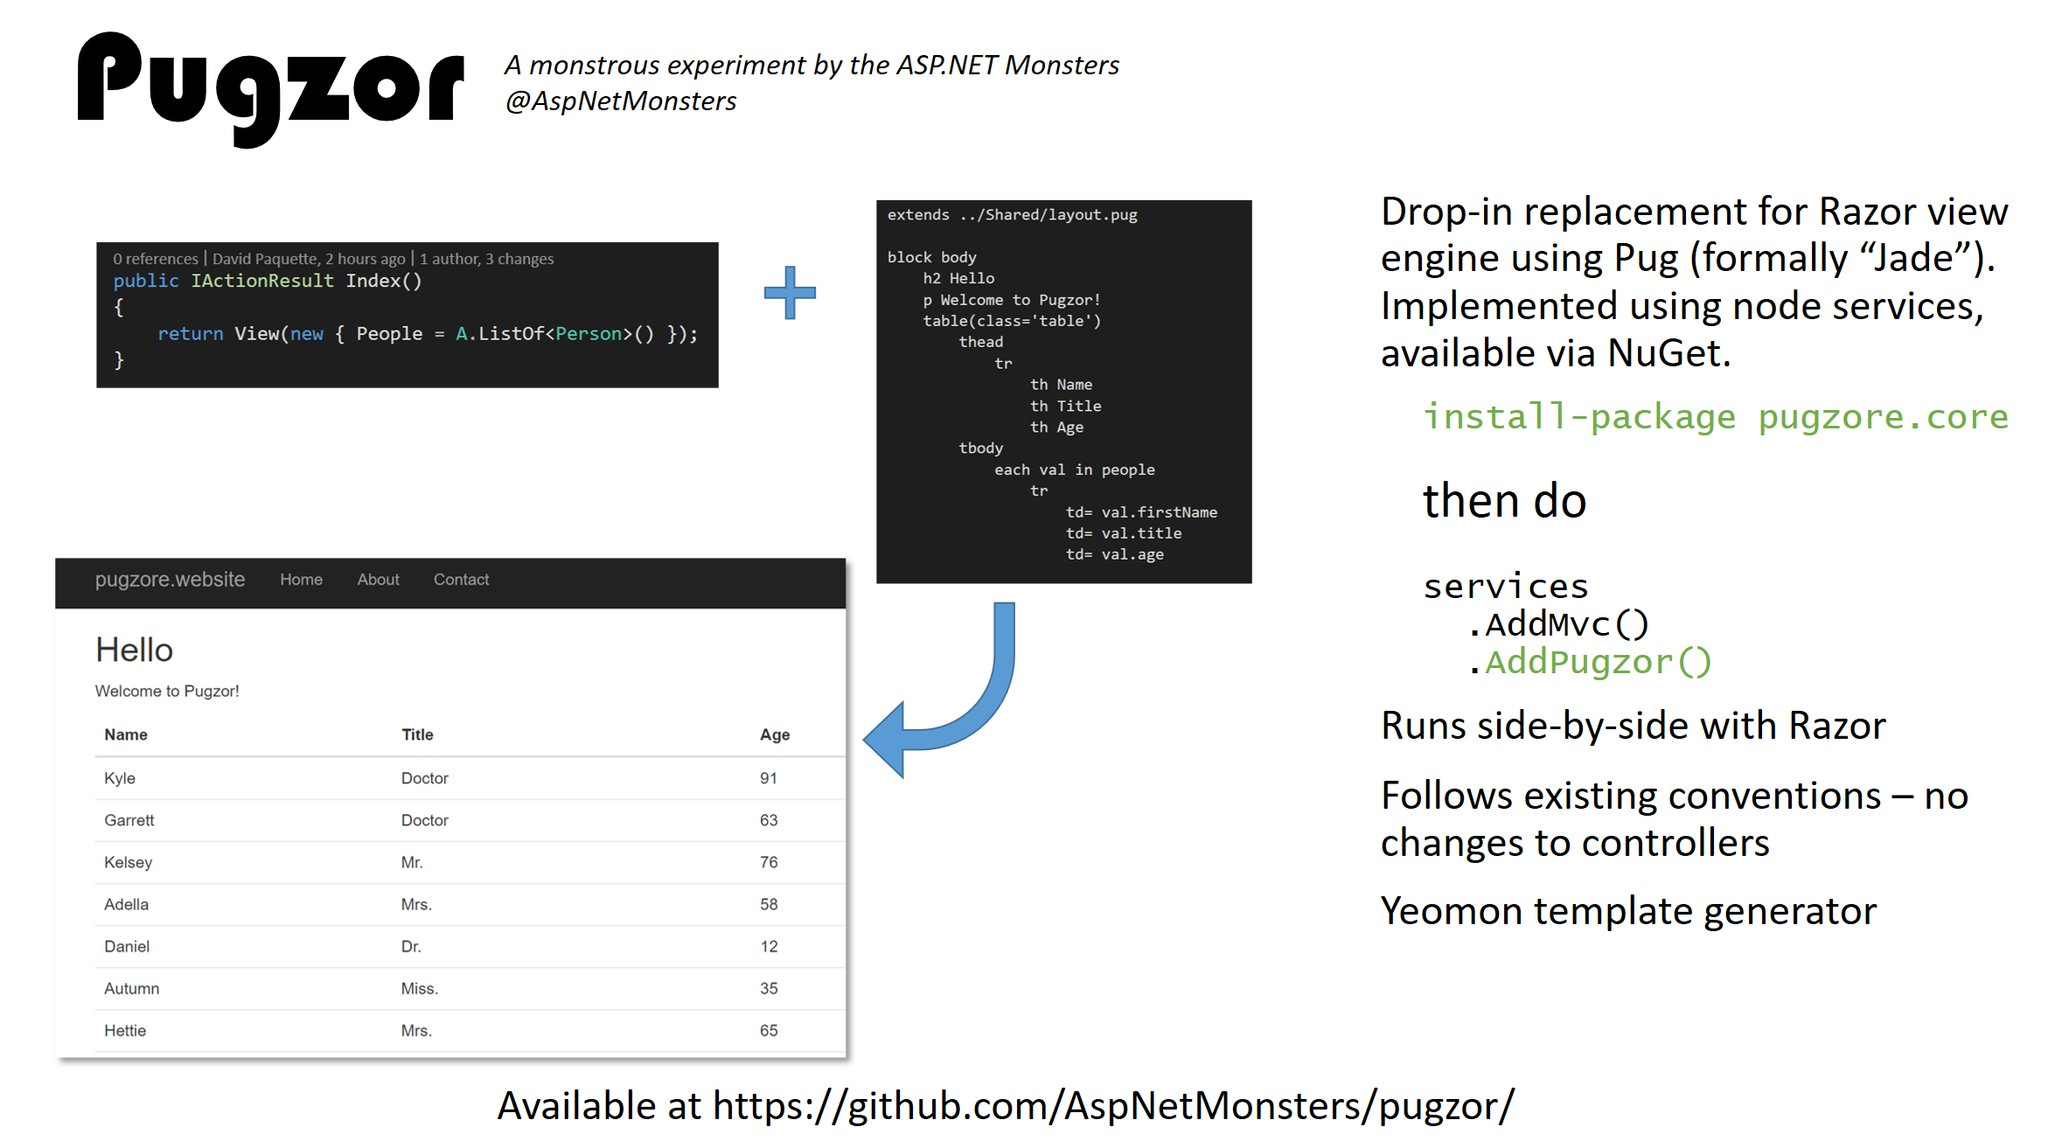
Like magic, we now have a working view engine. Here’s a simple example:

Controllers/HomeController.cs

public IActionResult Index()
{

ViewData.Add("Title", "Welcome to Pugzor!");
ModelState.AddModelError("model", "An error has occurred");
return View(new { People = A.ListOf<Person>() });
}

Views/Home/Index.pug

block body
h2 Hello
p #{ViewData.title}
table(class='table')
thead
tr
th Name
th Title
th Age
tbody
each val in people
tr
td= val.firstName
td= val.title
td= val.age

Result

<h2>Hello</h2>
<p>Welcome to Pugzor! </p>
<table class="table">
<thead>
<tr>
<th>Name</th>
<th>Title</th>
<th>Age</th>
</tr>
</thead>
<tbody>
<tr><td>Laura</td><td>Mrs.</td><td>38</td></tr>
<tr><td>Gabriel</td><td>Mr. </td><td>62</td></tr>
<tr><td>Judi</td><td>Princess</td><td>44</td></tr>
<tr><td>Isaiah</td><td>Air Marshall</td><td>39</td></tr>
<tr><td>Amber</td><td>Miss.</td><td>69</td></tr>
<tr><td>Jeremy</td><td>Master</td><td>92</td></tr>
<tr><td>Makayla</td><td>Dr.</td><td>15</td></tr>
<tr><td>Sean</td><td>Mr. </td><td>5</td></tr>
<tr><td>Lillian</td><td>Mr. </td><td>3</td></tr>
<tr><td>Brandon</td><td>Doctor</td><td>88</td></tr>
<tr><td>Joel</td><td>Miss.</td><td>12</td></tr>
<tr><td>Madeline</td><td>General</td><td>67</td></tr>
<tr><td>Allison</td><td>Mr. </td><td>21</td></tr>
<tr><td>Brooke</td><td>Dr.</td><td>27</td></tr>
<tr><td>Jonathan</td><td>Air Marshall</td><td>63</td></tr>
<tr><td>Jack</td><td>Mrs.</td><td>7</td></tr>
<tr><td>Tristan</td><td>Doctor</td><td>46</td></tr>
<tr><td>Kandra</td><td>Doctor</td><td>47</td></tr>
<tr><td>Timothy</td><td>Ms.</td><td>83</td></tr>
<tr><td>Milissa</td><td>Dr.</td><td>68</td></tr>
<tr><td>Lekisha</td><td>Mrs.</td><td>40</td></tr>
<tr><td>Connor</td><td>Dr.</td><td>73</td></tr>
<tr><td>Danielle</td><td>Princess</td><td>27</td></tr>
<tr><td>Michelle</td><td>Miss.</td><td>22</td></tr>
<tr><td>Chloe</td><td>Princess</td><td>85</td></tr>
</tbody>
</table>

All the features of pug work as expected, including templage inheritance and inline JavaScript code. Take a look at our test website for some examples.

Packaging it all up

So we reached our goal of creating an alternate view engine for MVC in a single day. We had some time left so we thought we would try to take this one step further and create a NuGet package. There were some challenges here, specifically related to including the required node modules in the NuGet package. Simon is planning to write a separate blog post on that topic.

You can give it a try yourself. Add a reference to the pugzor.core NuGet package then call .AddPugzor() after .AddMvc() in the Startup.ConfigureServices method.

public void ConfigureServices(IServiceCollection services)
{
    // Add framework services.
    services.AddMvc().AddPugzor();
}

Razor still works as the default but if no Razor view is found, the MVC framework will try using the PugzorViewEngine. If a matching pug template is found, that template will be rendered.

Pugzor

Wrapping it up

We had a blast working on this project. While this started out as a silly excercise, we sort of ended up with something that could be useful. We were really surprised at how easy it was to create a new view engine for MVC. We don’t expect that Pugzor will be wildly popular but since it works we thought we would put it out there and see what people think.

We have some open issues and some ideas for how to extend the PugzorViewEngine. Let us know what you think or jump in and contribute some code. We accept pull requests :-)

Loading View Components from a Class Library in ASP.NET Core MVC

In a previous post we explored the new View Component feature of ASP.NET Core MVC. In today’s post we take a look at how view components can be implemented in a separate class library and shared across multiple web applications.

Creating a class library

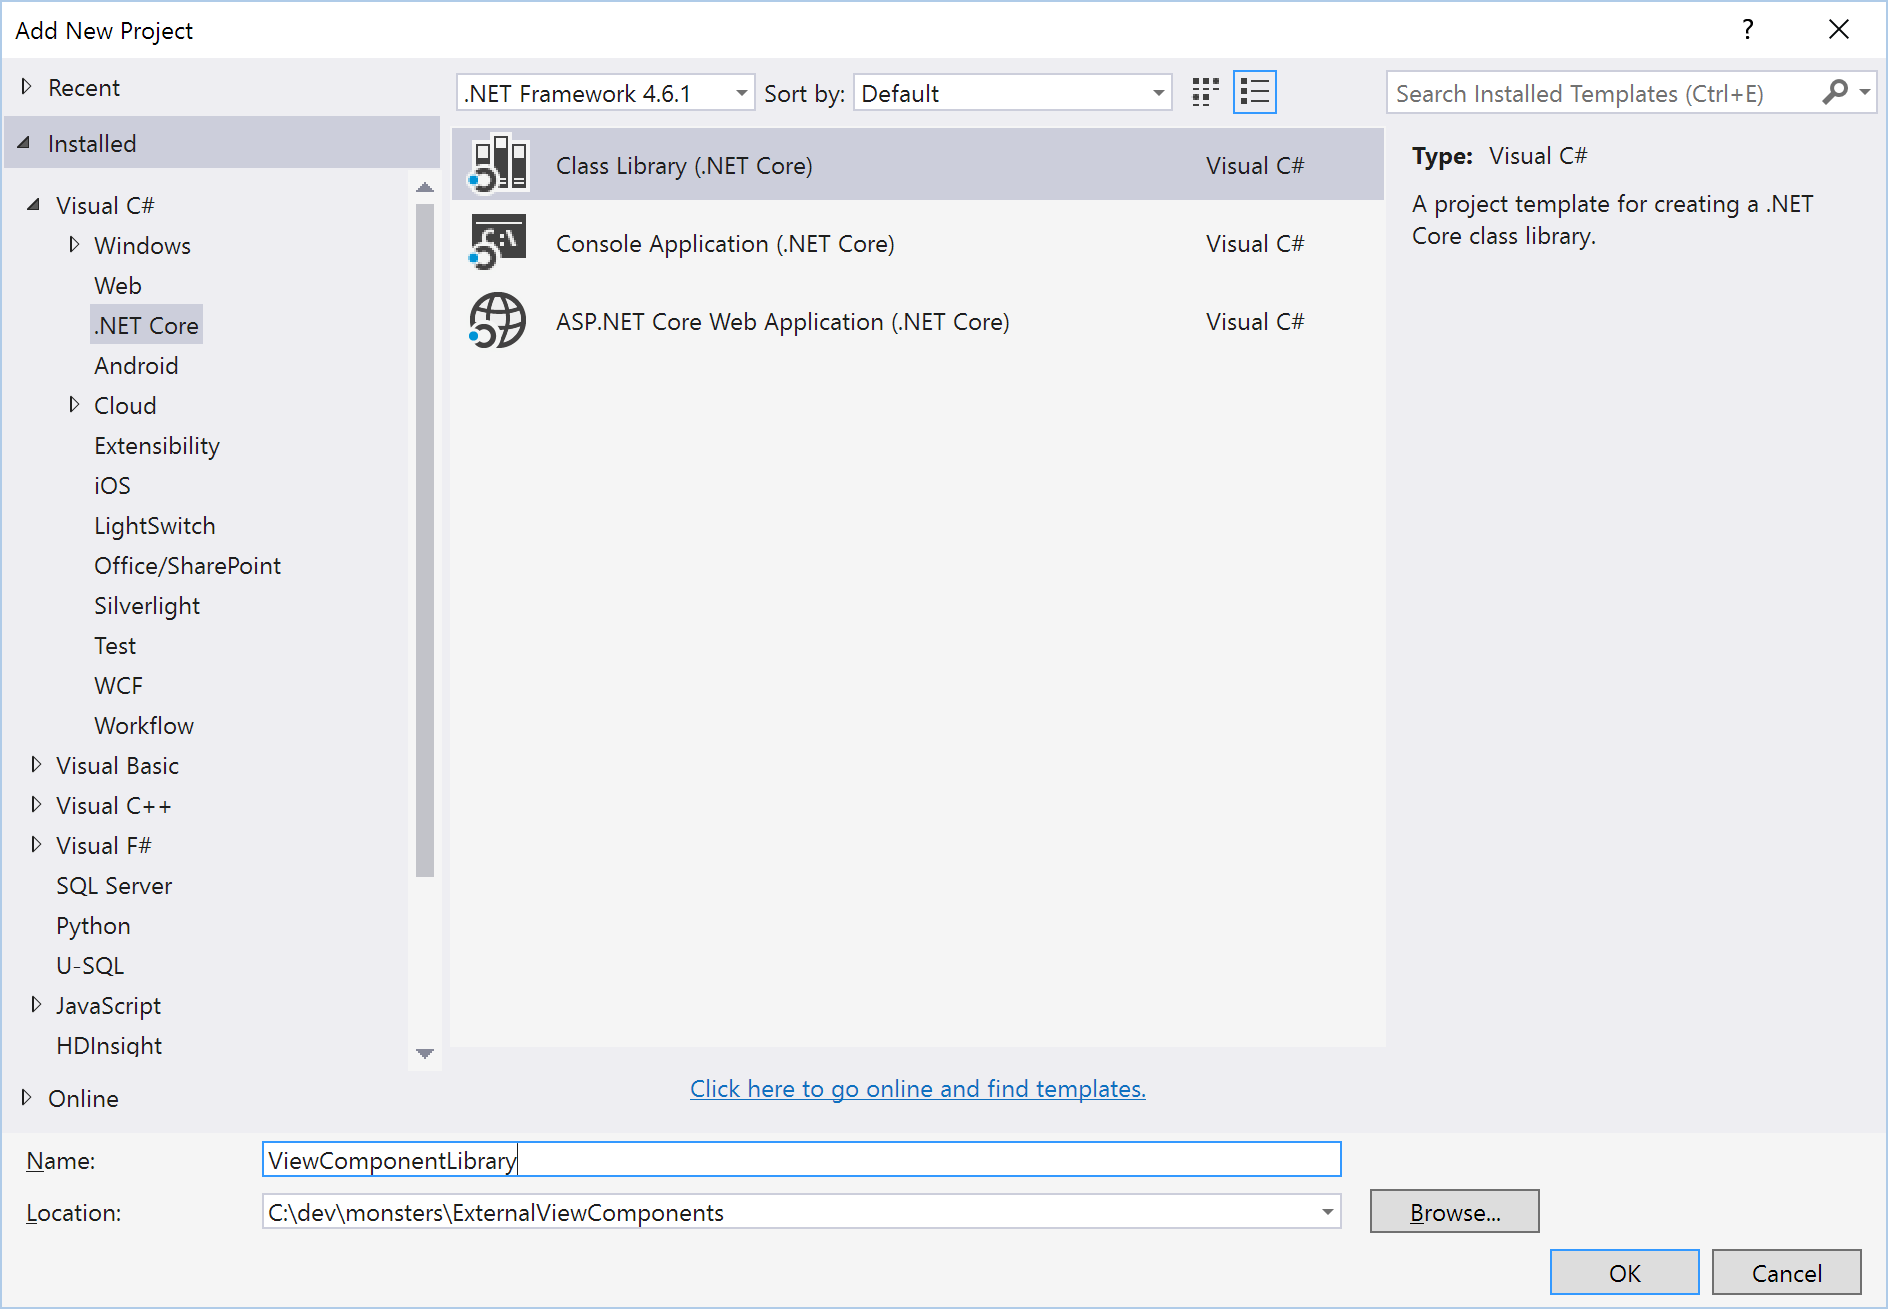
First, add a a new .NET Core class library to your solution.

Add class library

This is the class library where we will add our view components but before we can do that we have to add a reference to the MVC and Razor bits.

"dependencies": {
"NETStandard.Library": "1.6.0",
"Microsoft.AspNetCore.Mvc": "1.0.0",
"Microsoft.AspNetCore.Razor.Tools": {
"version": "1.0.0-preview2-final",
"type": "build"
}
},
"tools": {
"Microsoft.AspNetCore.Razor.Tools": "1.0.0-preview2-final"
}

Now we can add a view component class to the project. I created a simple example view component called SimpleViewComponent.

[ViewComponent(Name = "ViewComponentLibrary.Simple")]
public class SimpleViewComponent : ViewComponent
{
public IViewComponentResult Invoke(int number)
{
return View(number + 1);
}
}

By convention, MVC would have assigned the name Simple to this view component. This view component is implemented in a class library with the intention of using it across multiple web apps which opens up the possibility of naming conflicts with other view components. To avoid naming conflicts, I overrode the name using the [ViewComponent] attribute and prefixed the name with the name of my class library.

Next, I added a Default.cshtml view to the ViewComponentLibrary in the Views\Shared\Components\Simple folder.

@model Int32

<h1>
Hello from an external View Component!
</h1>
<h3>Your number is @Model</h3>

For this view to be recognized by the web application, we need to include the cshtml files as embedded resources in the class library. Currently, this is done by adding the following setting to the project.json file.

"buildOptions": {
"embed": "Views/**/*.cshtml"
}

Referencing external view components

The first step in using the external view components in our web application project is to add a reference to the class library. Once the reference is added, we need tell the Razor view engine that views are stored as resources in the external view library. We can do this by adding some additional configuration code to the ConfigureServices method in Startup.cs. The additional code creates a new EmbeddedFileProvider for the class library then adds that file provider to the RazorViewEngineOptions.

public void ConfigureServices(IServiceCollection services)
{

// Add framework services.
services.AddApplicationInsightsTelemetry(Configuration);

services.AddMvc();

//Get a reference to the assembly that contains the view components
var assembly = typeof(ViewComponentLibrary.ViewComponents.SimpleViewComponent).GetTypeInfo().Assembly;

//Create an EmbeddedFileProvider for that assembly
var embeddedFileProvider = new EmbeddedFileProvider(
assembly,
"ViewComponentLibrary"
);

//Add the file provider to the Razor view engine
services.Configure<RazorViewEngineOptions>(options =>
{
options.FileProviders.Add(embeddedFileProvider);
});
}

Now everything is wired up and we can invoke the view component just like we would for any other view component in our ASP.NET Core MVC application.

<div class="row">
@await Component.InvokeAsync("ViewComponentLibrary.Simple", new { number = 5 })
</div>

Wrapping it up

Storing view components in a separate assembly allows them to be shared across multiple projects. It also opens up the possibility of creating a simple plugin architecture for your application. We will explore the plugin idea in more detail in a future post.

You can take a look at the full source code on GitHub.

ASP.NET Core Distributed Cache Tag Helper

The anxiously awaited ASP.NET Core RC2 has finally landed and with it we have a shiny new tag helper to explorer.

We previously talked about the Cache Tag Helper and how it allows you to cache the output from any section of a Razor page. While the Cache Tag Helper is powerful and very useful, it is limited in that it uses an instance of IMemoryCache which stores cache entries in memory in the local process. If the server process restarts for some reason, the contents of the cache will be post. Also, if your deployment consists of multiple servers, each server would have its own cache, each potentially containing different contents.

Distributed Cache Tag Helper

The cache tag helper left people wanting more. Specifically they wanted to store the cached HTML in a distributed cache like Redis. Instead of complicating the existing Cache Tag Helper, the ASP.NET team enabled this use-case by adding a new Distributed Cache Tag Helper.

Using the Distributed Cache Tag Helper is very similar to using the Cache Tag Helper:

<distributed-cache name="MyCache">
<p>Something that will be cached</p>
@DateTime.Now.ToString()
</distributed-cache>

The name property is required and the value should be unique. It is used as a prefix for the cache key. This differs from the Cache Tag Helper which uses an automatically generated unique id based on the location of the cache tag helper in your Razor page. The auto generated approach cannot be used with a distributed cache because Razor would generate different unique ids for each server. You will need to make sure that you use a unique name each time you use the distributed-cache tag helper. If you unintentionally use the same name in multiple places, you might get the same results in 2 places.

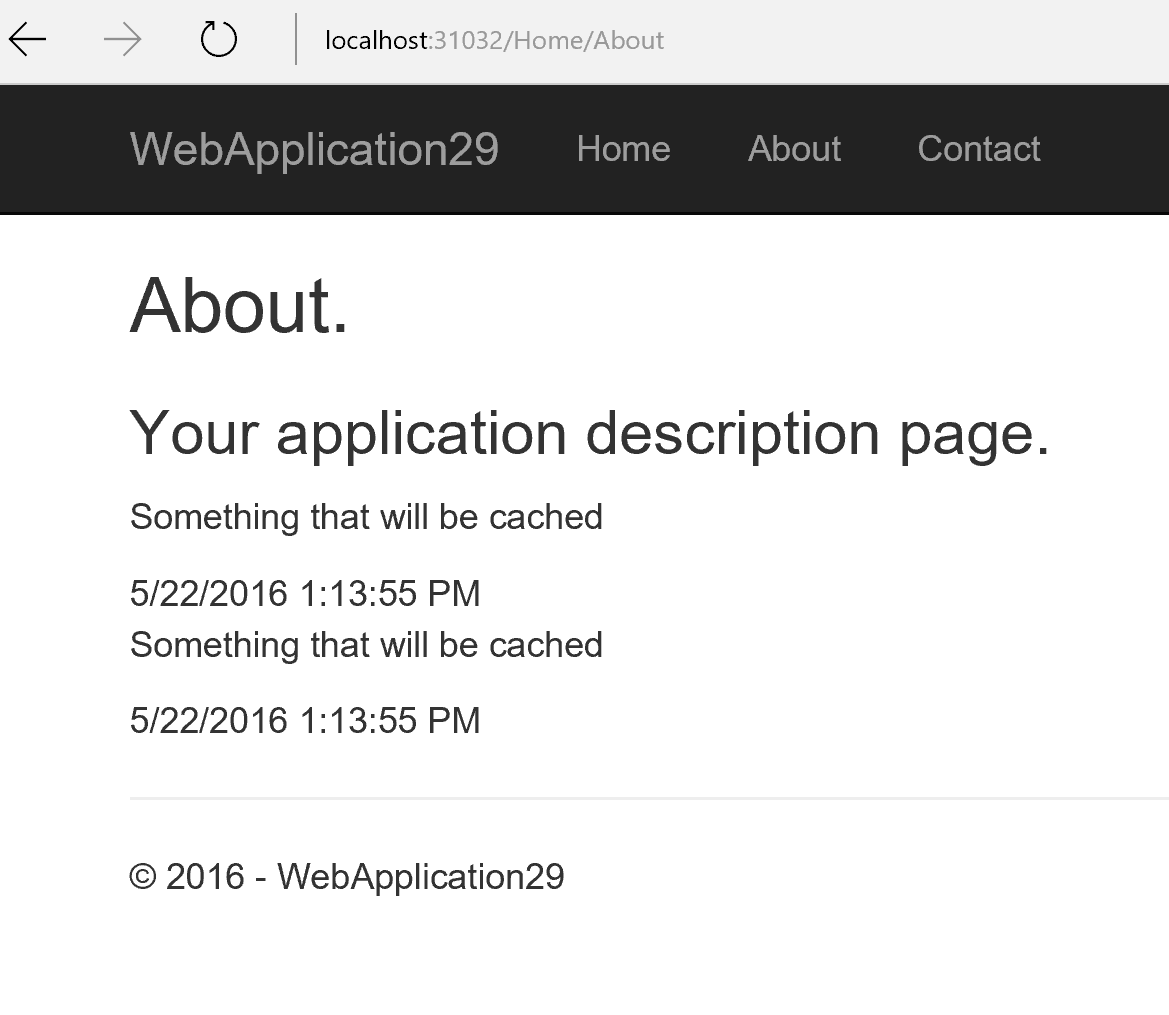
For example, see what happens when 2 distributed-cache tag helpers with the same name:

<distributed-cache name="MyCache">
<p>Something that will be cached</p>
@DateTime.Now.ToString()
</distributed-cache>

<distributed-cache name="MyCache">
<p>This should be different</p>
@DateTime.Now.ToString()
</distributed-cache>

Accidental Cache Key Collision

If you are really curious about the how cache keys are generated for both tag helpers, take a look at the CacheTagKey Class.

The vary-by-* and expires-* attributes all work the same as the Cache Tag Helper. You can review those in my previous post.

Configuring the Distributed Cache

Unless you specify some additional configuration, the distributed cache tag helper actually uses a local process in memory cache. This might seem a little strange but it does help with the developer workflow. As a developer, I don’t need to worry about standing up a distributed cache like Redis just to run the app locally. The intention of course is that a true distributed cache would be used in a staging/production environments.

The simplest approach to configuring the distributed cache tag helper is to configure a IDistributedCache service in the Startup class. ASP.NET Core ships with 2 distributed cache implementations out of the box: SqlServer and Redis.

As a simple test, let’s try specifying a SqlServerCache in the Startup.ConfigureServices method:

services.AddSingleton<IDistributedCache>(serviceProvider =>
new SqlServerCache(new SqlServerCacheOptions()
{
ConnectionString = @"Data Source=(localdb)\MSSQLLocalDB;Initial Catalog=DistributedCacheTest;Integrated Security=True;",
SchemaName = "dbo",
TableName = "MyAppCache"
}));

Of course, the ConnectionString should be stored in a configuration file but for demonstration purposes I have in-lined it here.

You will need to create the database and table manually. Here is a script for creating the table, which I extracted from here:

CREATE TABLE MyAppCache(            
Id nvarchar(449) COLLATE SQL_Latin1_General_CP1_CS_AS NOT NULL,
Value varbinary(MAX) NOT NULL,
ExpiresAtTime datetimeoffset NOT NULL,
SlidingExpirationInSeconds bigint NULL,
AbsoluteExpiration datetimeoffset NULL,
CONSTRAINT pk_Id PRIMARY KEY (Id))

CREATE NONCLUSTERED INDEX Index_ExpiresAtTime ON MyAppCache(ExpiresAtTime)

Now when I visit the page that contains the distributed-cache tag helper, I get the following error:

InvalidOperationException: Either absolute or sliding expiration needs to be provided.

The SQL Server implementation requires us to specify some form of expiry. No problem, let’s just add the those attributes to the tag helper:

<distributed-cache name="MyCacheItem1" expires-after="TimeSpan.FromHours(1)">
<p>Something that will be cached</p>
@DateTime.Now.ToString()
</distributed-cache>


<distributed-cache name="MyCacheItem2" expires-sliding="TimeSpan.FromMinutes(30)">
<p>This should be different</p>
@DateTime.Now.ToString()
</distributed-cache>

Now the page renders properly and we can see the contents in SQL Server:

SQL Server Cache Contents

Note that since the key is hashed and the value is stored in binary, the contents of the table in SQL server are not human readable.

For more details on working with a SQL Server or Redis distrubted cache, see the official ASP.NET Docs;

Even more configuration

In some cases, you might want more control over how values are serialized or even how the distributed cache is used by the tag helper. In those cases, you could implement your own IDistributedCacheTagHelperFormatter and/or IDistributedCacheTagHelperStorage.

In cases where you need complete control, you could implement your own IDistributedCacheTagHelperService.

I suspect that this added level of customization won’t be needed by most people.

Conclusion

The Distributed Cache Tag Helper provides an easy path to caching HTML fragments in a distributed cache. Out of the box, Redis and SQL Server are supported. Over time, I expect that a number of alternative distributed cache implementations will be provided by the community.